Checking the version of Windows 11 on your PC is not just out of curiosity, but it also has practical implications that affect how you use your computer every day. It is important to know the specifics of your operating system to ensure compatibility with software and drivers, and to stay updated with the latest features. This knowledge is essential for maintaining an efficient and secure computing environment.
Ensure Compatibility
When you're getting ready to install new software or hardware, one of the first things you should do is check if your Windows 11 version meets the minimum requirements. This is really important because software developers and hardware manufacturers design their products to work with specific versions of Windows. If you try to use software or hardware on a version of Windows 11 that it doesn't support, you may run into a lot of problems like your system crashing, certain features not working properly, or even security risks.
Let me give you an example. Imagine you want to install a new graphics editor. When you start the installation process, the setup wizard will usually ask you to check if your system is running at least the Windows 11 21H2 update. This particular update is required for the graphics editor to work smoothly and give you the best performance possible. If your Windows 11 version is older than that, you'll need to update your system before you can proceed with the installation.
Now, let's talk about drivers. I can recall a situation where my friend experienced a sound issue after updating to Windows 11. He discovered that the manufacturer of his sound card had released a new driver that was compatible with the latest version of Windows 11 he had just installed. This driver update specifically addressed the sound problem he was facing. This shows why it's important to keep track of your operating system version because it can affect how well your devices function.
So, always remember to check if your Windows 11 version meets the minimum requirements before installing new software or hardware. It will help ensure that everything works smoothly and you avoid any unnecessary issues.
Identify New Features and Improvements
When Microsoft releases a new version of Windows 11, they add new features, make improvements, and enhance security. These changes can have a big impact on how you use your PC. It's important to keep track of what's new in each release so you can make the most of Windows 11.
For example, the latest update, called Windows 11 21H2, introduced features like Snap Layouts and Snap Groups. These features help you multitask more efficiently by allowing you to organize your open windows in a better way. It also improved the touch keyboard by adding new themes and quick settings. This makes it easier to customize your settings, especially if you're using a tablet.
Keeping your Windows 11 up to date is not only about getting new features, but also about staying secure. Each update includes important security patches that fix vulnerabilities that could be exploited by malware or hackers. By installing these updates, you're taking an essential step in protecting your online privacy and keeping your personal data safe from potential threats. So it's always a good idea to make sure you have the latest version of Windows 11 installed on your PC.
Methods to Check Windows 11 Version
When you want to check which version of Windows 11 you have, there are different ways you can do it. These methods are designed for people with different levels of technical knowledge and preferences. Let me guide you through some easy and effective ways to find out the exact version of Windows 11 on your computer.
Method 1: Using the Settings App
The Settings app in Windows 11 is the easiest way for you to check which version you have. It's designed to be user-friendly, so it's probably the first place you'll want to go. Here's what you need to do:
- Open the Settings app by pressing
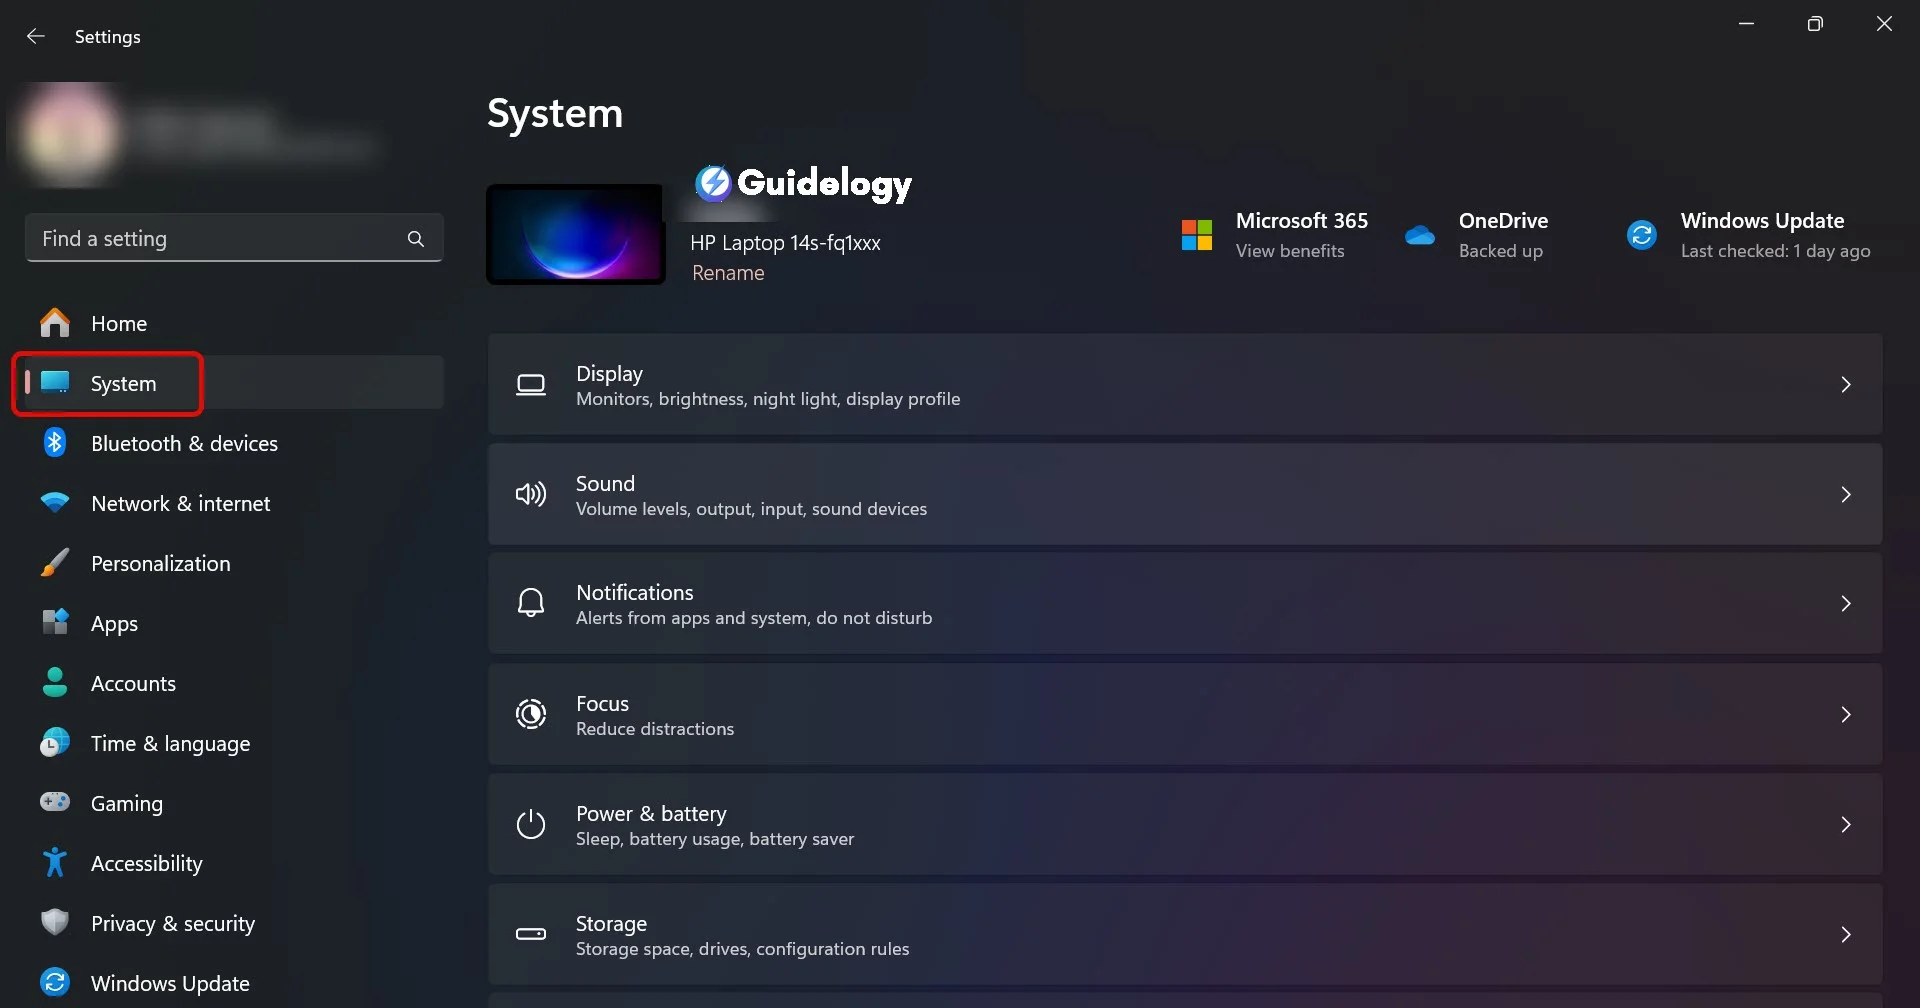
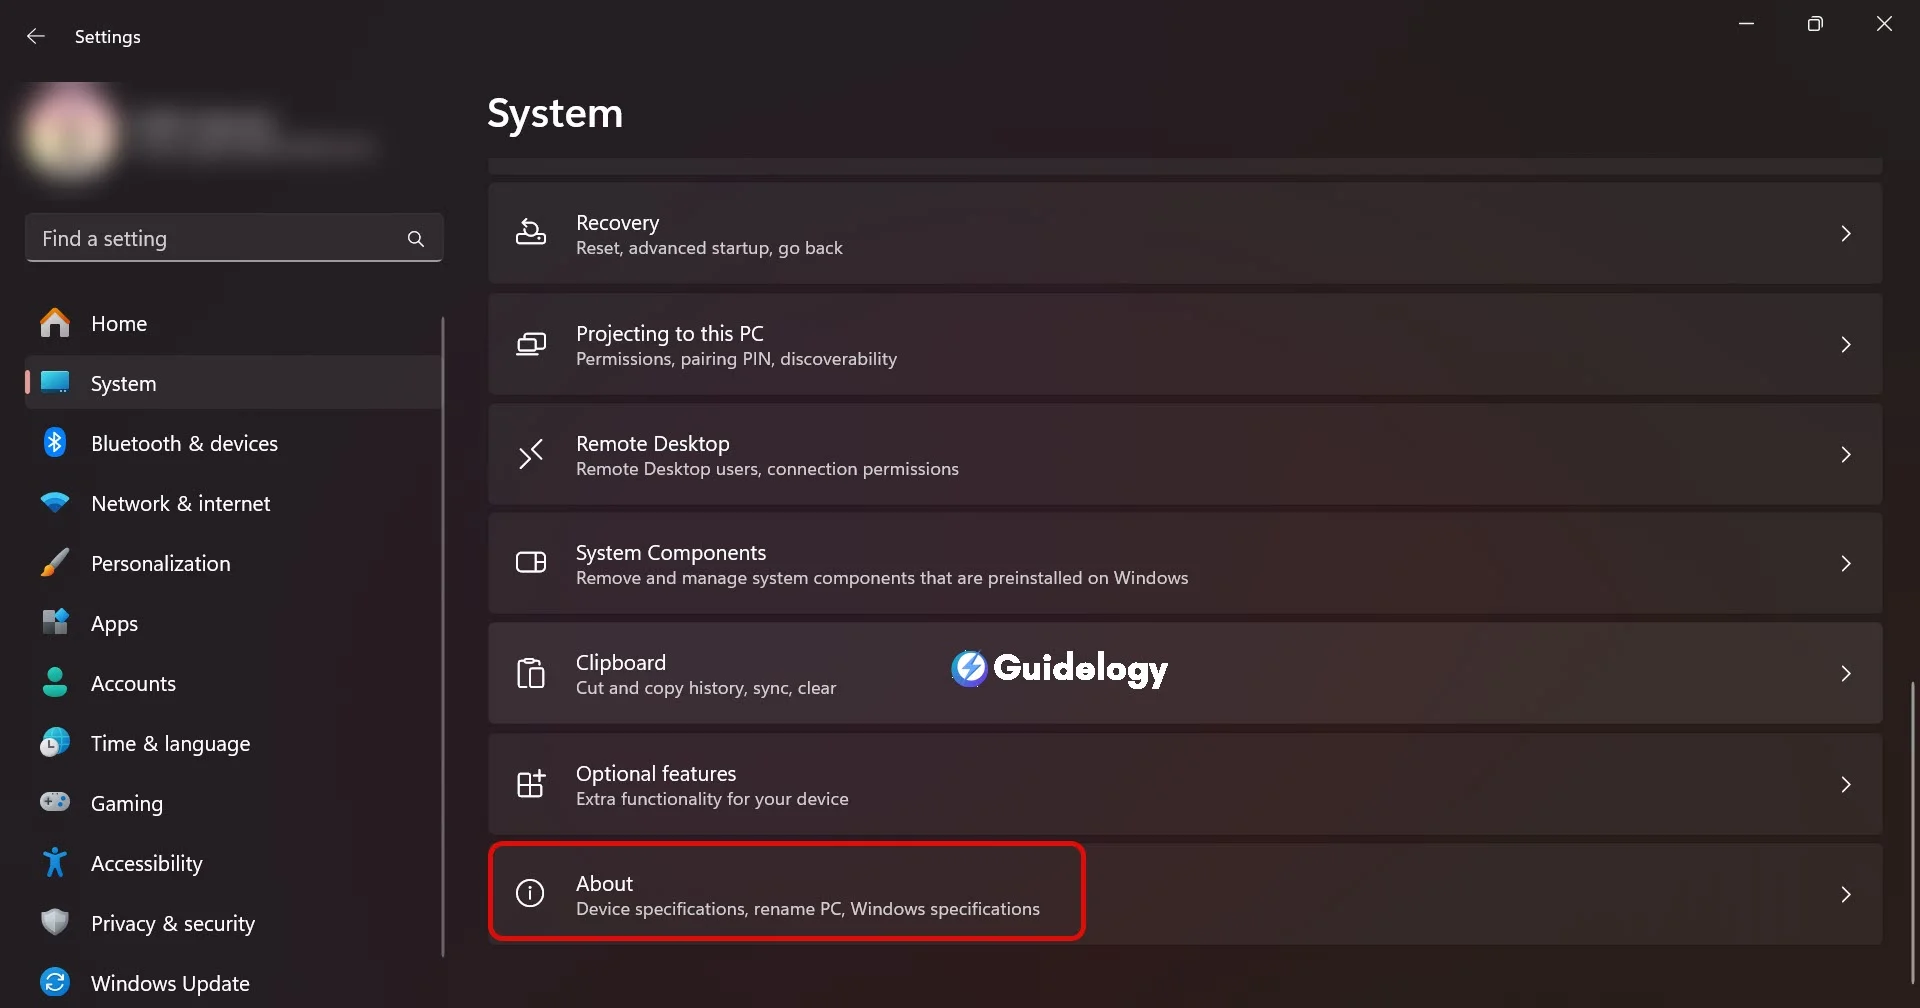
Win + Ion your keyboard. - Click on System, and then scroll down to select About.
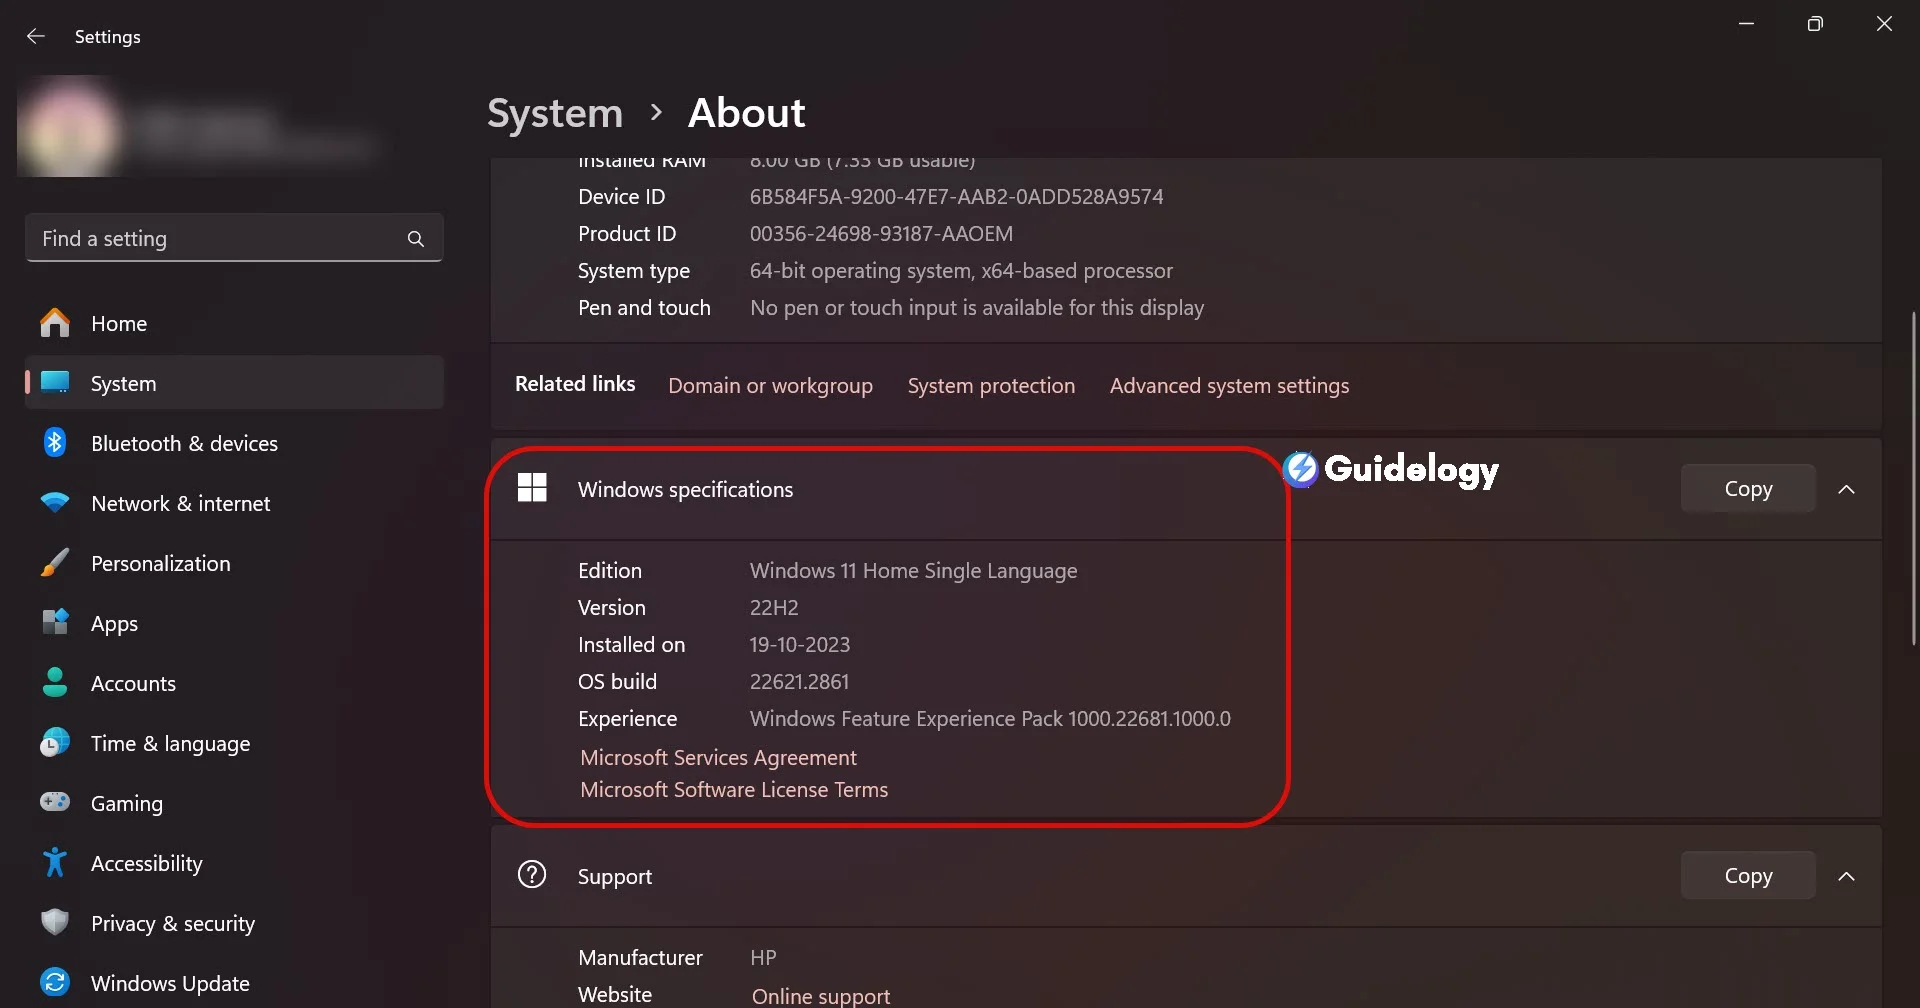
- Look under the Windows specifications section. Here, you'll find the Edition, Version, and Installed on date for your Windows 11 operating system.
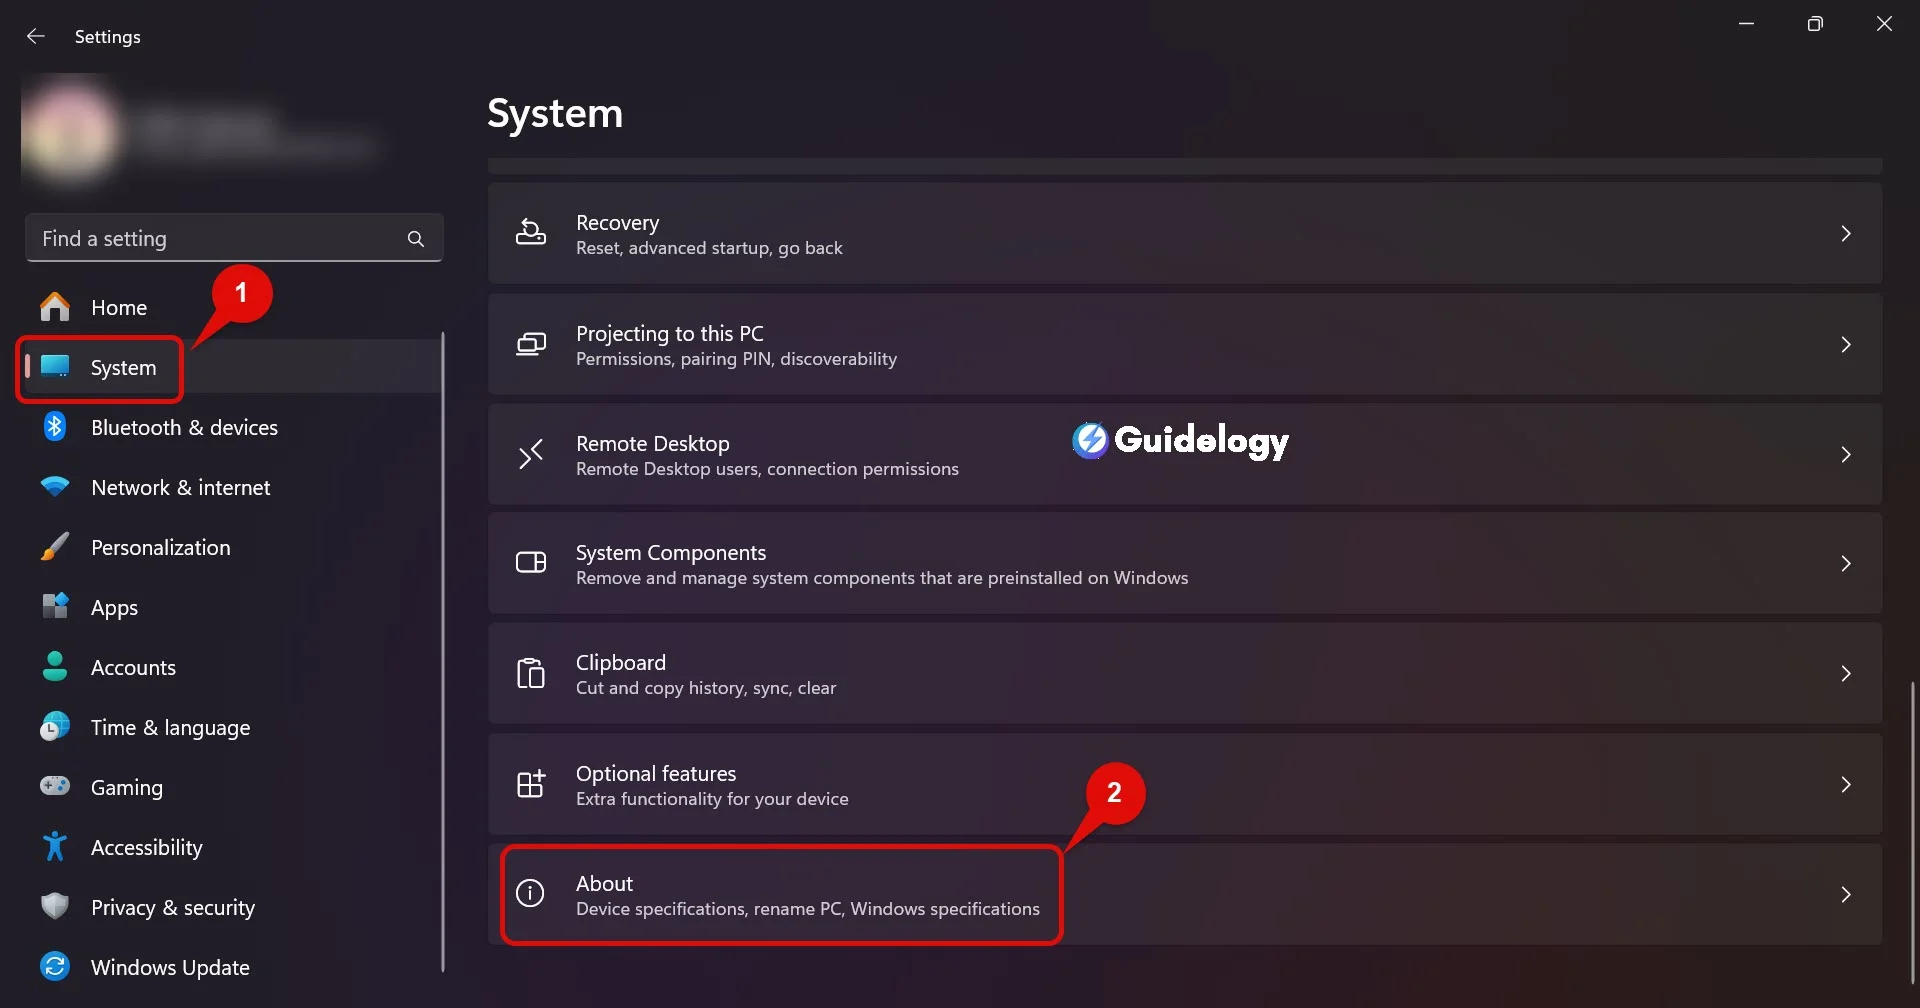
The Version is the detail you're looking for—it typically comprises a version number like 21H2, which indicates the year and half of the year when the version was released.
Method 2: Using the Command Prompt
For those who are more comfortable using command-line tools, the Command Prompt offers a quick way to check your Windows 11 version. Here's how you can quickly pull up my version info:
- Press
Win + Rto open the Run dialog. - Type
cmdand hit Enter to open the Command Prompt. - Once in Command Prompt, type
winverand press Enter.
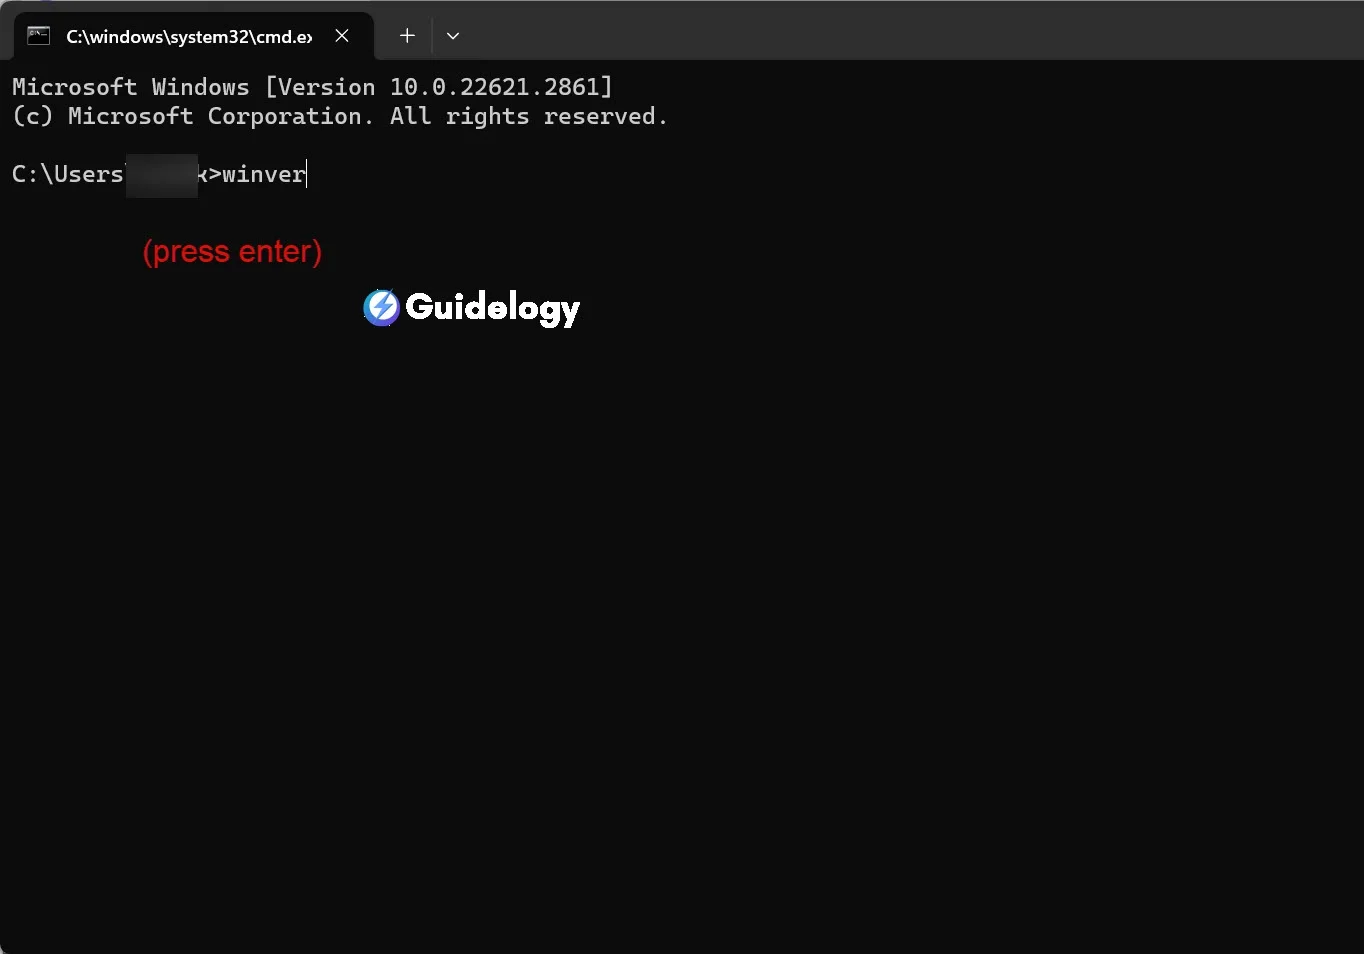
A dialog box will appear showing your Windows 11 version along with the OS build and other relevant information. It's a fast, no-frills approach that gets you the info you need promptly.
Method 3: Using the Registry Editor
The Registry Editor is a powerful tool and it's where you can find a breadth of information about your system, including the Windows 11 version. But, you must emphasize that this method is best for advanced users, as making changes in the Registry Editor can affect system stability. Here's what to do if you decide to use it:
- Press
Win + Rto open the Run dialog. - Type
regeditand press Enter to open the Registry Editor. - Navigate to
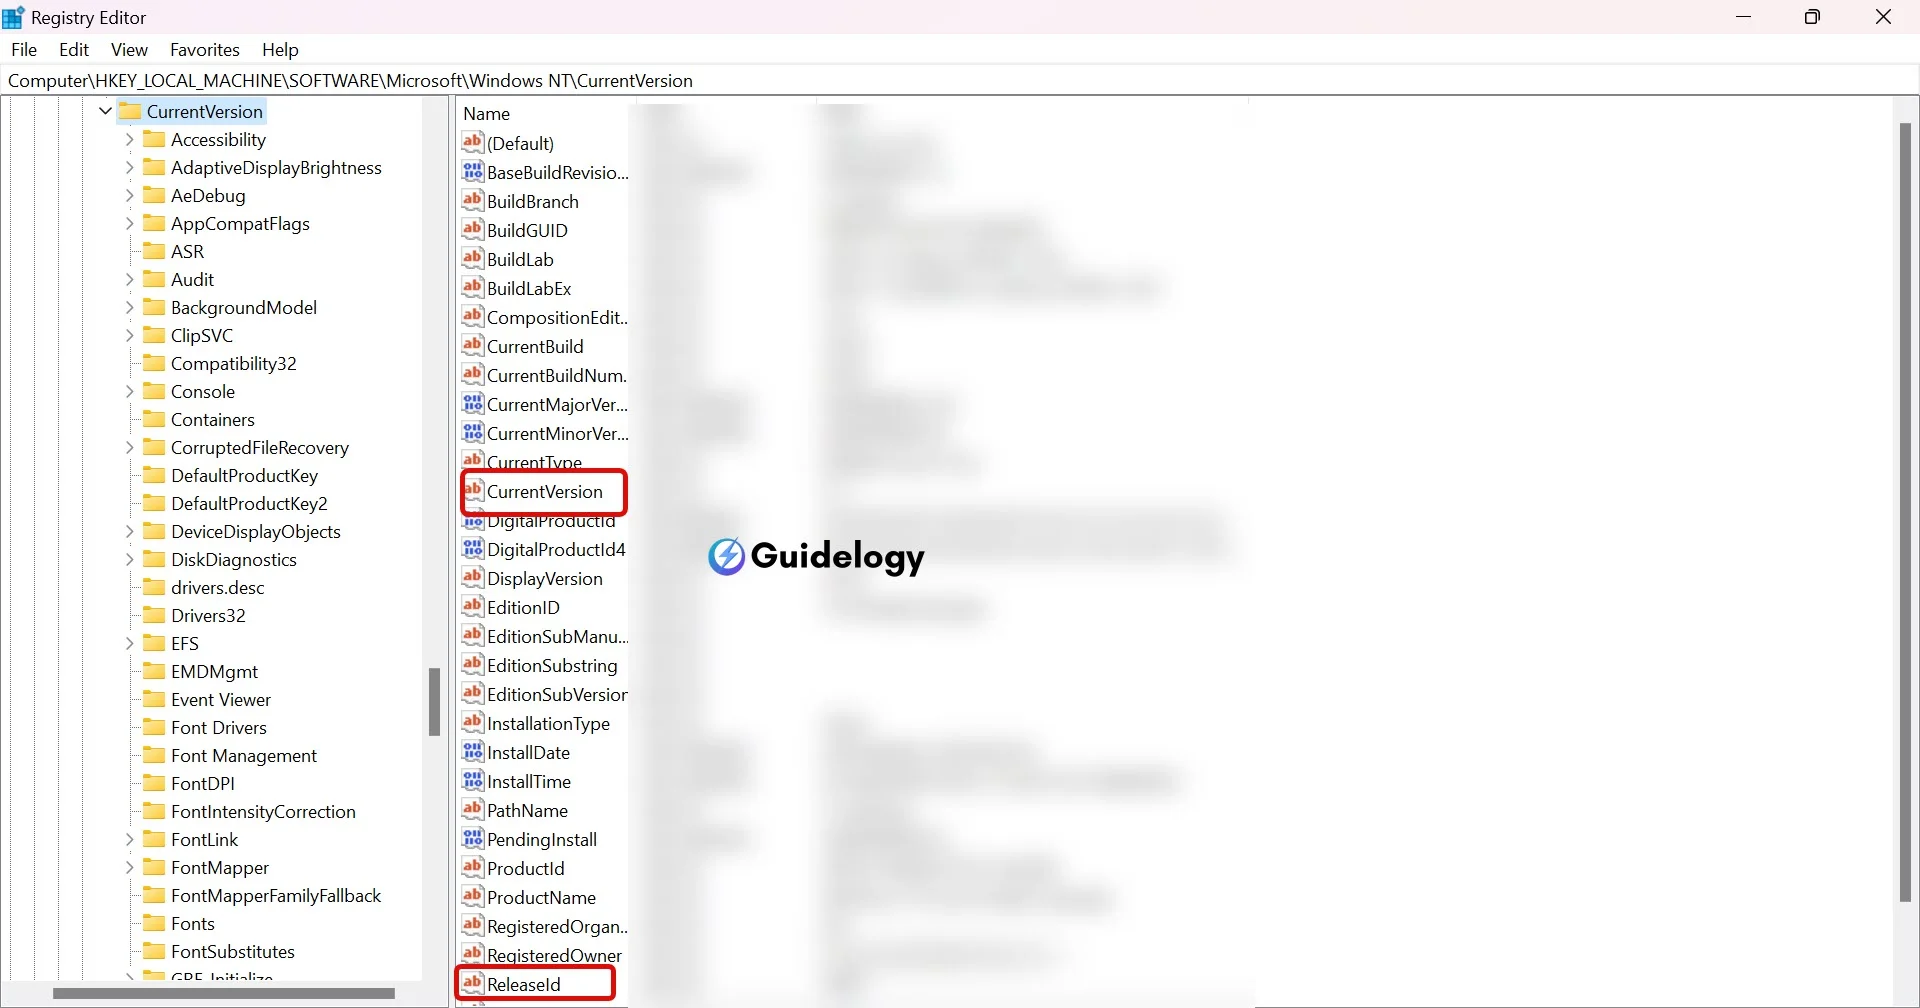
HKEY_LOCAL_MACHINE\SOFTWARE\Microsoft\Windows NT\CurrentVersion.
Within the CurrentVersion key, you'll find entries such as “CurrentVersion” and “ReleaseId” that contain details about your Windows 11 version. Remember, navigating the Registry Editor requires care, so tread lightly if you're not familiar with this environment.
Every method we've mentioned gives you a dependable way to check which version of Windows 11 you have. It's important to stay up-to-date and use the operating system that suits you best. Whether you like a simple approach through the Settings app or a more technical method using the Command Prompt or Registry Editor, you can easily find the information you need.
How to Check Windows 11 Version Using the Settings App
Step 1: Open the Settings App
To begin, you can access the Settings app on your PC by clicking on the Start menu and selecting the gear-shaped icon labeled “Settings“. Another convenient way is to press the Windows key + I on your keyboard for quick access. This method is user-friendly and suitable for people who may not be very familiar with technology.
Step 2: Navigate to the System Settings
Once you open the Settings app, you'll find a category called “System” right at the top. It's easy to spot as soon as the app opens. In this section, you'll see different sub-menus for things like your PC's display, notifications, power, and most importantly, the “About” section. This is where you'll find detailed information about your Windows 11 installation.
Step 3: Click on the About Option
Scroll down to the bottom of the System settings and click on “About“. This is where you can find detailed information about your PC's specifications and operating system details. Look for the section called “Windows specifications” to find out which version of Windows 11 you are currently using.
Step 4: Check the Version and Build Number
In the “Windows specifications” section, you'll find some important details listed, like the Edition, Version, Installed on date, and Build number of Windows 11. These details are really useful in helping you understand exactly which version of Windows 11 you have. It's especially helpful to know the exact version and build number when you want to check if software is compatible or if you're troubleshooting system issues.
By providing this step-by-step guidance, our aim is to make the process of checking your Windows 11 version straightforward and hassle-free.
How to Check Windows 11 Version Using the Command Prompt
If you want to find out which version of Windows 11 you have, you can use the Command Prompt. It's a useful tool for troubleshooting and checking compatibility with software. It may not be as user-friendly as other options, but it's great for those who prefer using text-based commands.
Step 1: Open the Command Prompt
The first step requires opening the Command Prompt. Here's how you can do it quickly:
- Press
Windows + Sto open the search bar. - Then, type in “Command Prompt.”
- Look for the Command Prompt application.
- Finally, Click on it or hit
Enterto launch it.
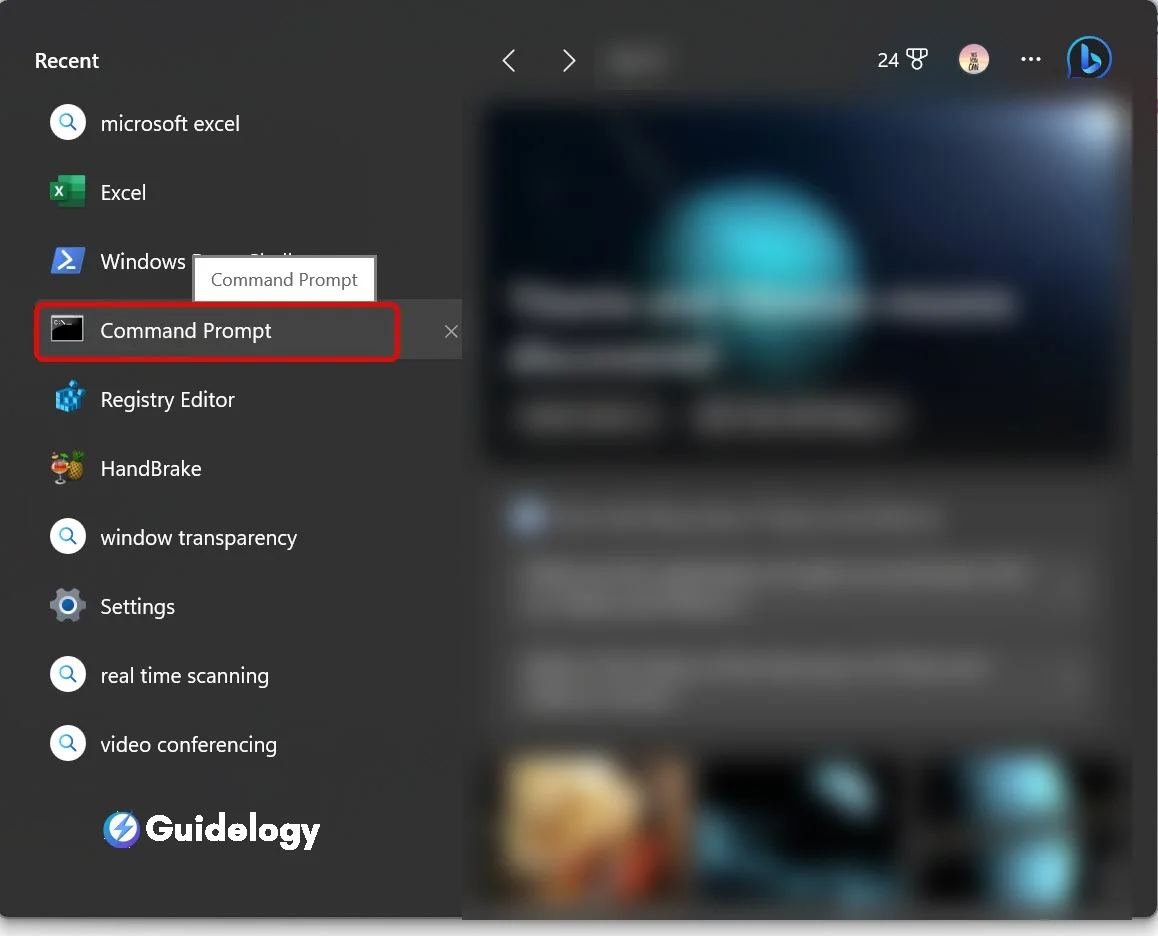
For those looking for an alternative method, you can also right-click on the Windows icon and select “Windows Terminal (Admin)” from the options. Don't worry, the Command Prompt can be accessed within the Windows Terminal as well.
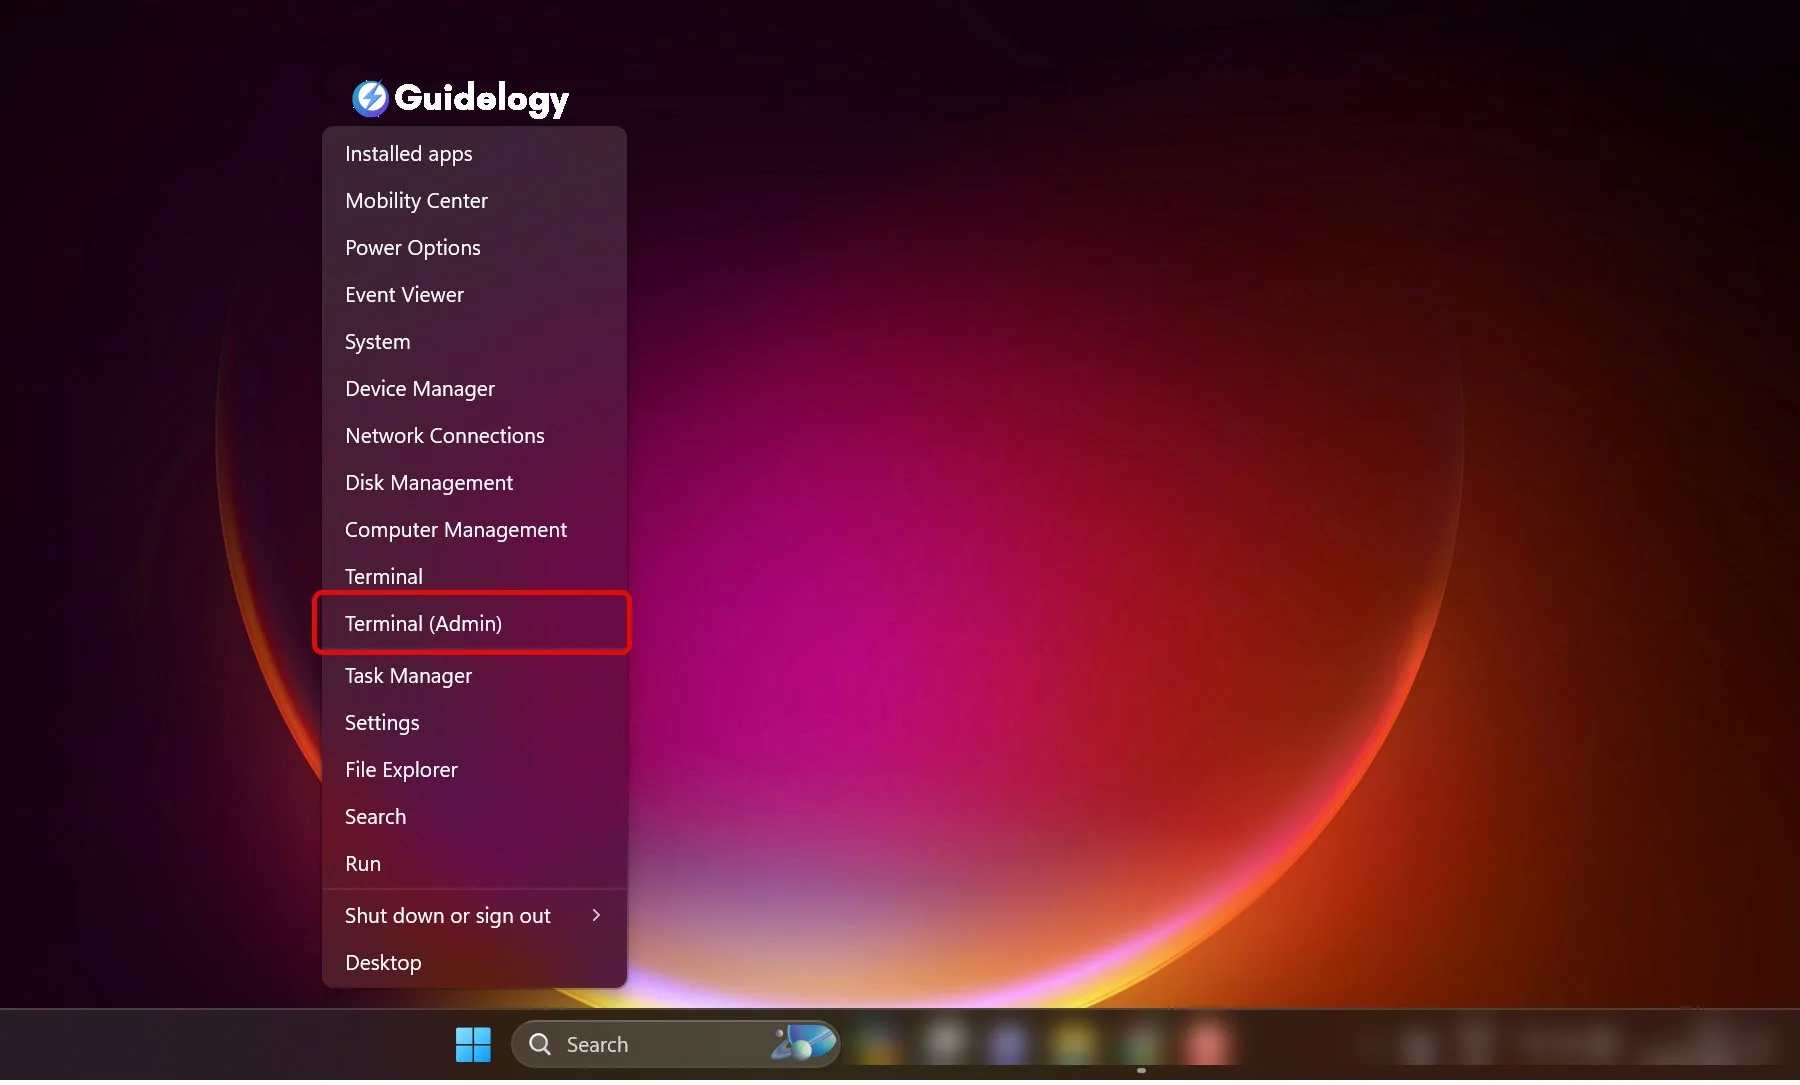
Step 2: Execute the “winver” Command
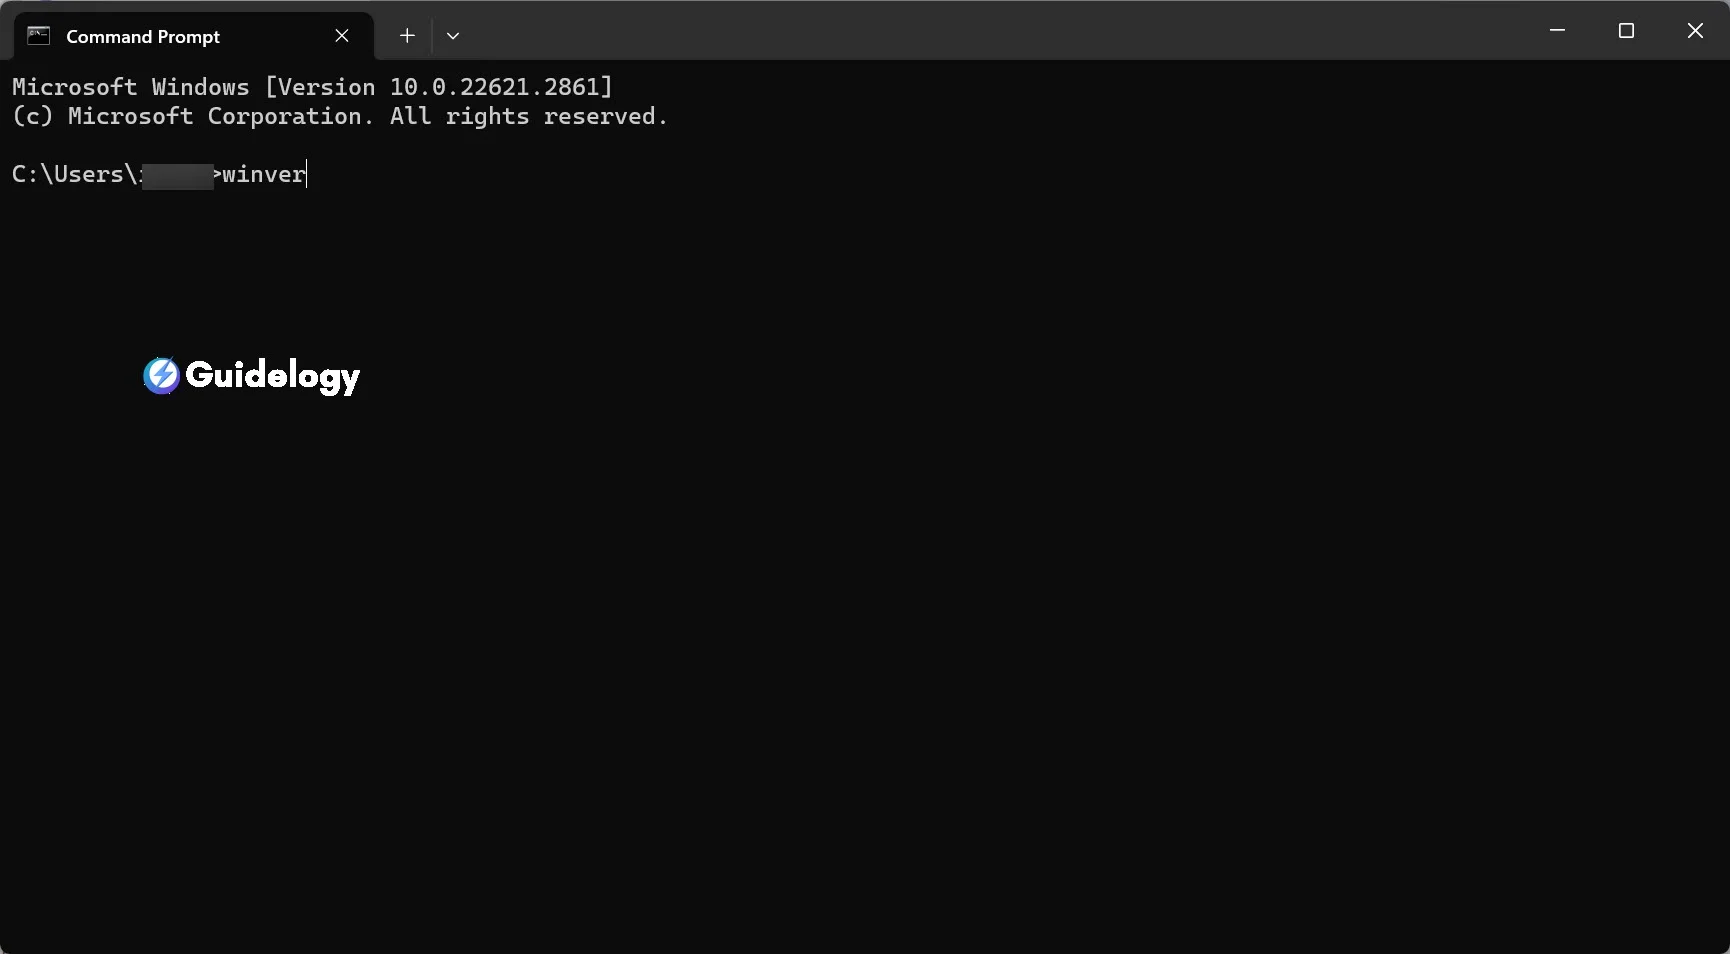
After opening the Command Prompt, it's time to find out the version of Windows 11. To do this, type the following command and press Enter:
winverThis command doesn't require administrative privileges, and it's a straightforward way to evoke a dialog box displaying the Windows version along with other details.
Step 3: Check the Version and Build Number
Once the “About Windows” box appears, you will find the important information you are looking for. In this dialog, you can find the version and OS build details. The version number tells you which version of Windows 11 you have, while the build number gives you more specific information about the update level of your operating system.
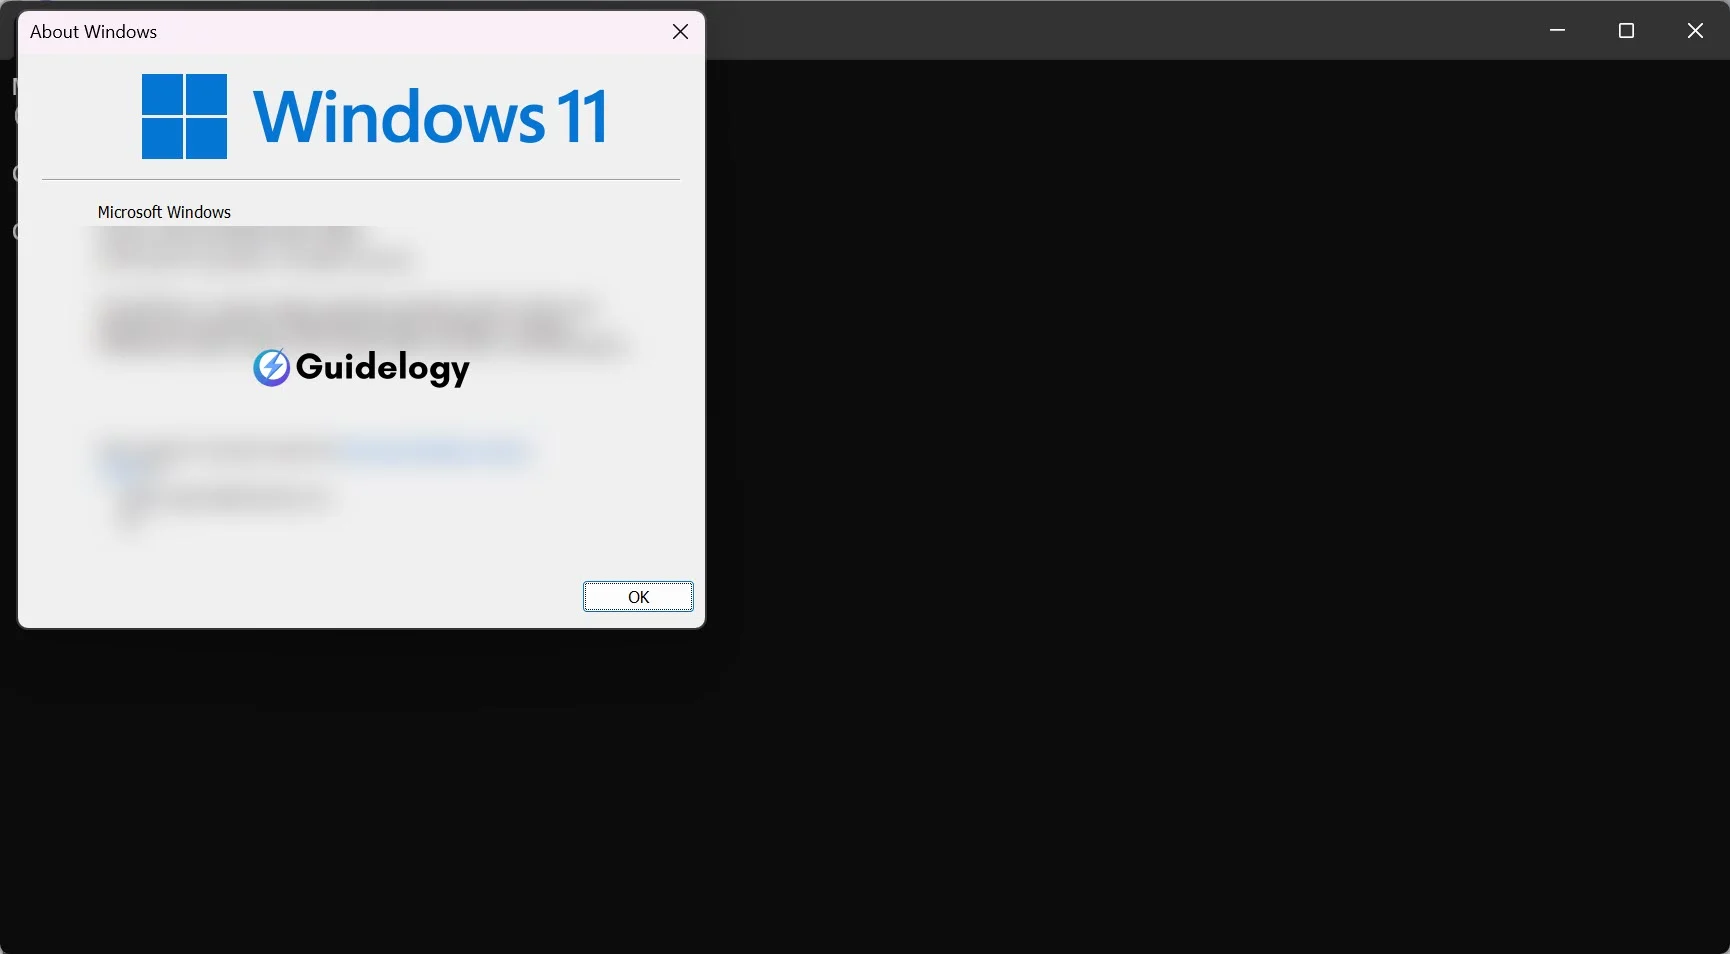
By following these steps, you can find out which version of Windows 11 you have and get detailed information about the specific build. This is important when you're working with developers or checking system requirements for specific applications. It helps you stay updated with your operating system's capabilities and maintain awareness of your system.
How to Check Windows 11 Version Using the Registry Editor
Step 1: Open the Registry Editor
To begin, let me walk you through opening the Registry Editor. It's a powerful tool that lets you view and modify settings in the system registry, where Windows stores important information about how things work. Press the Windows key and R together to open the Run dialog box. Now, type “regedit” and hit Enter. You may see a prompt from User Account Control, asking for permission. Simply choose Yes to run the Registry Editor with administrative privileges.
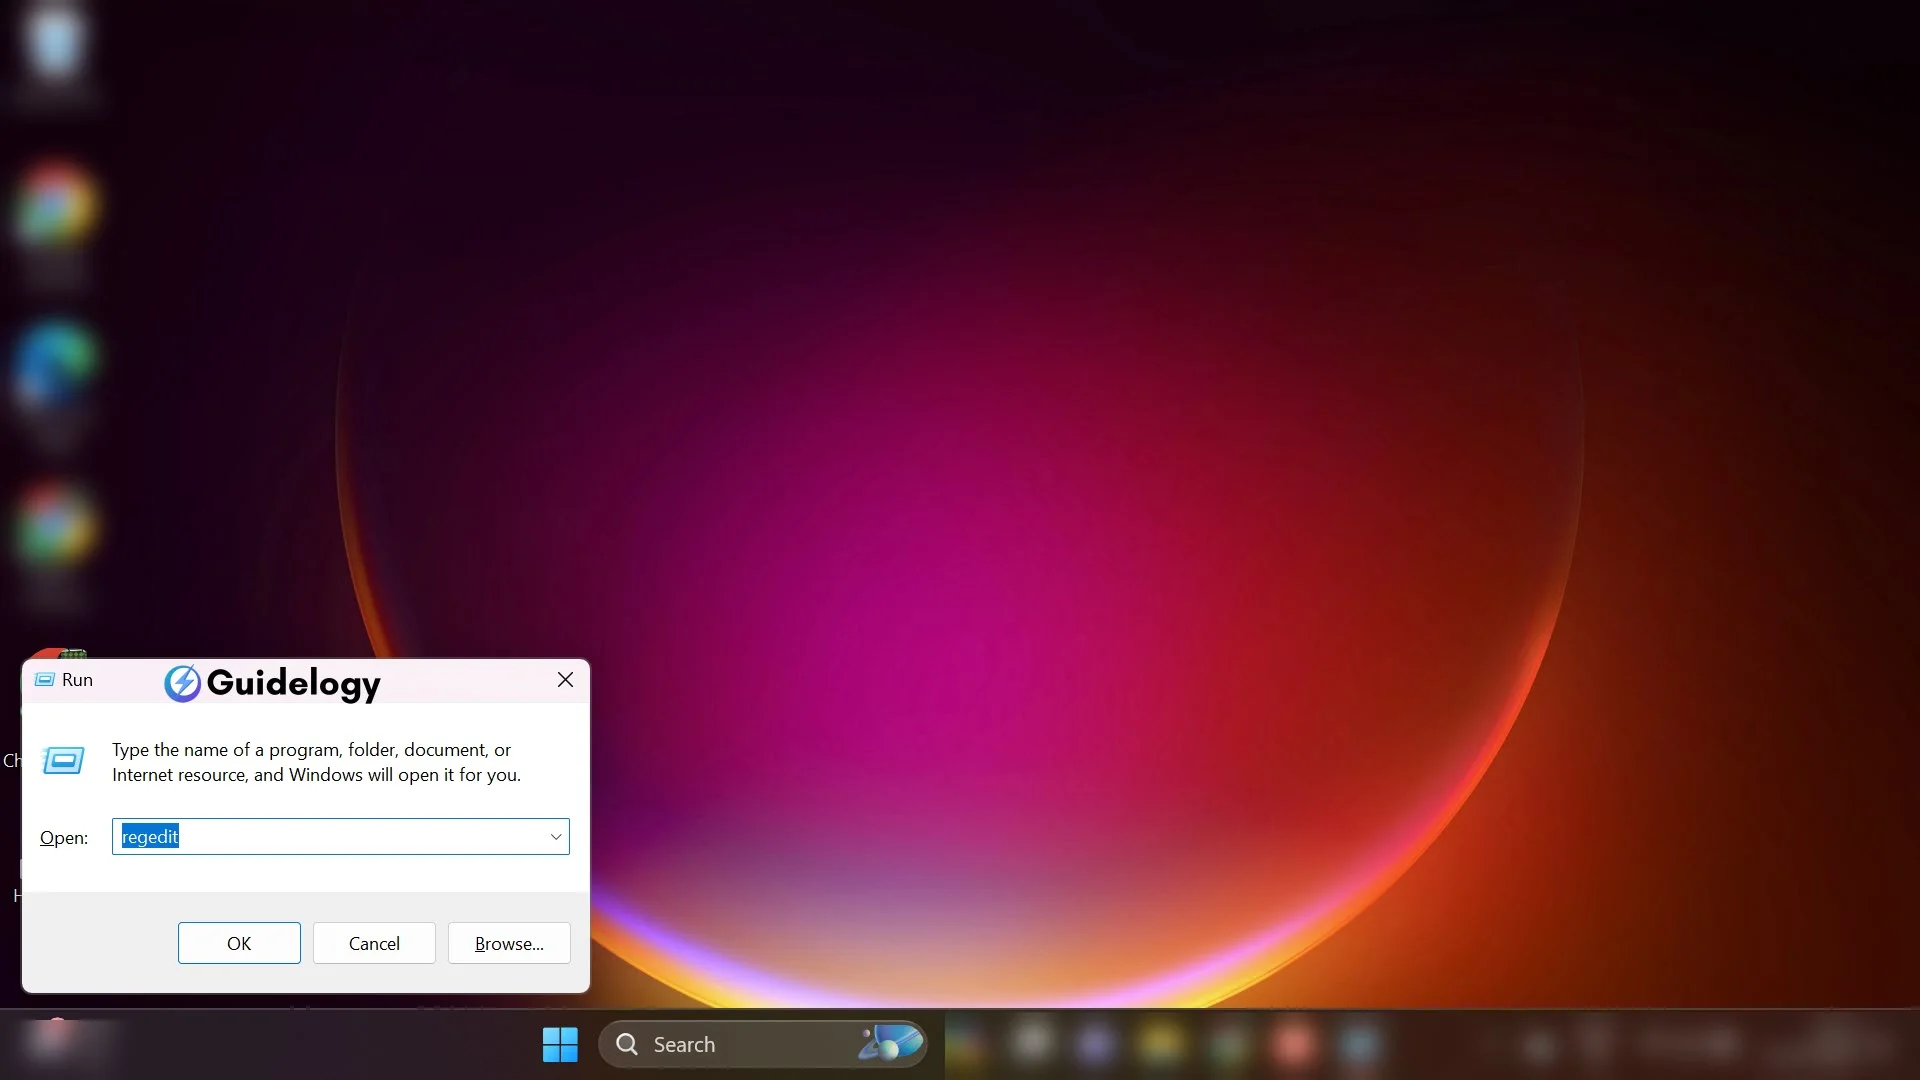
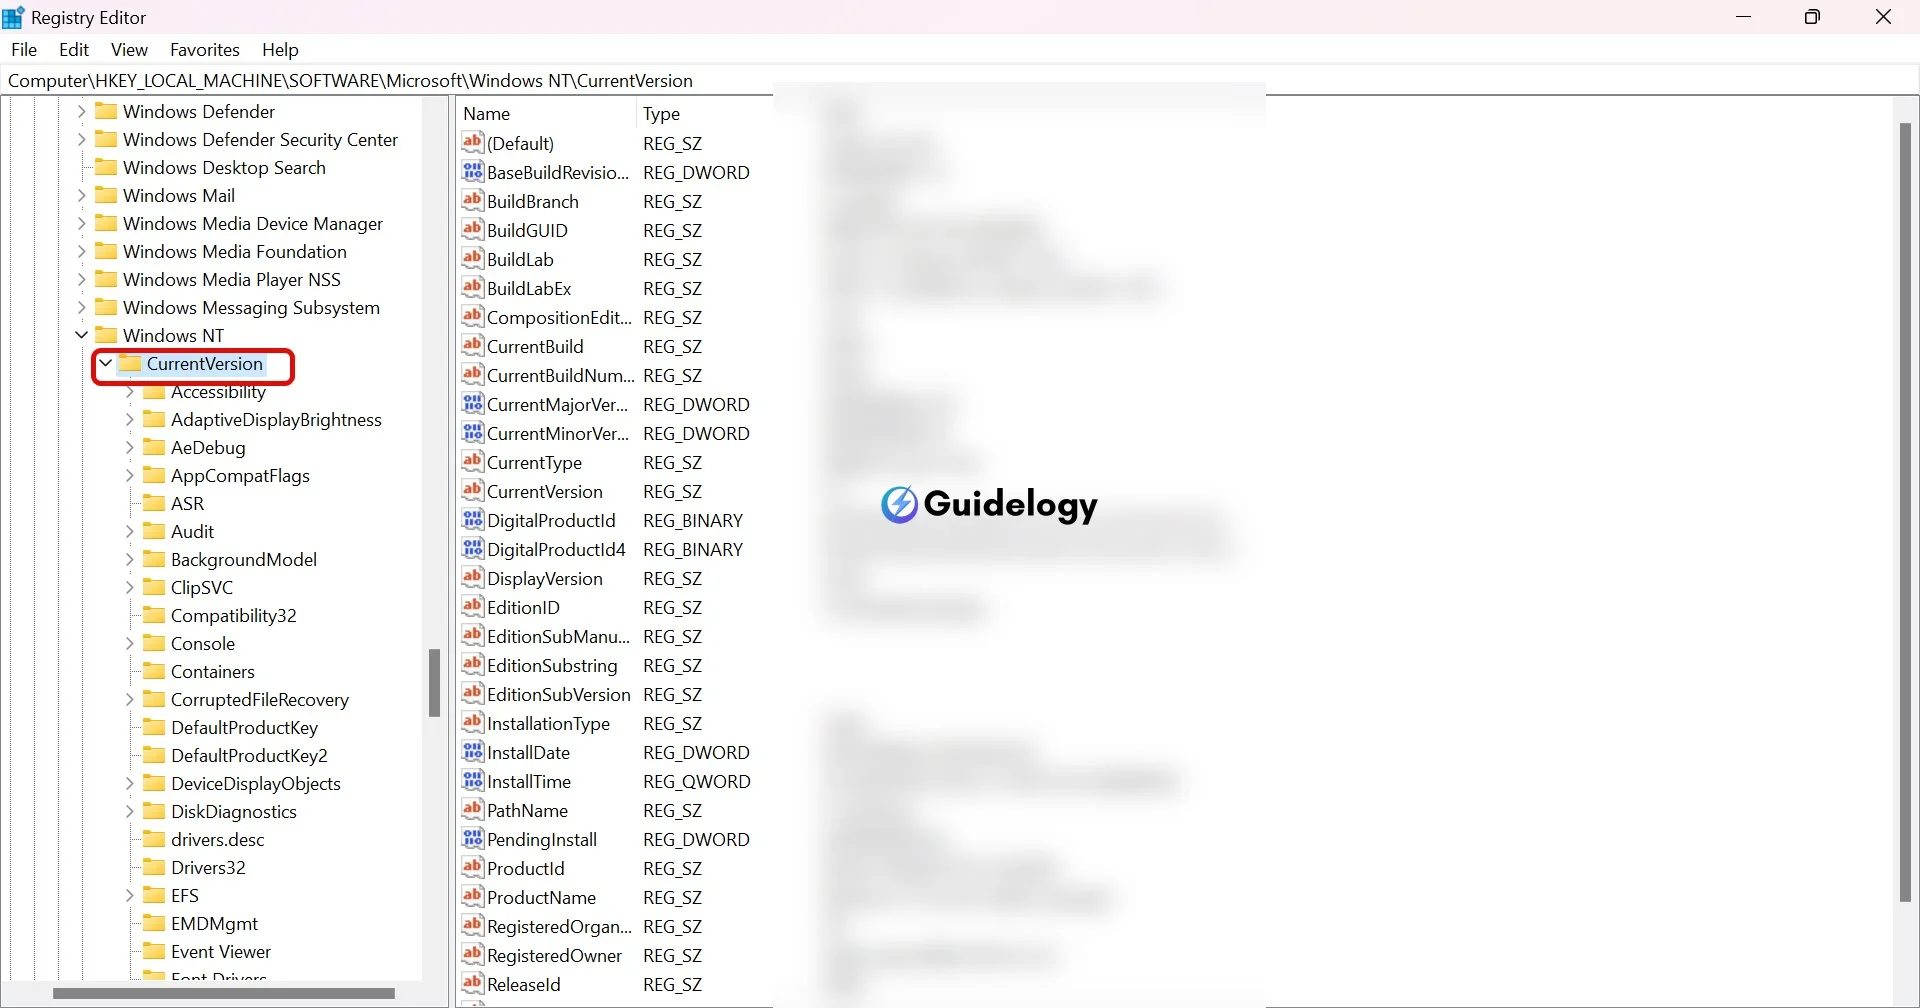
Step 2: Navigate to the Windows Version Key
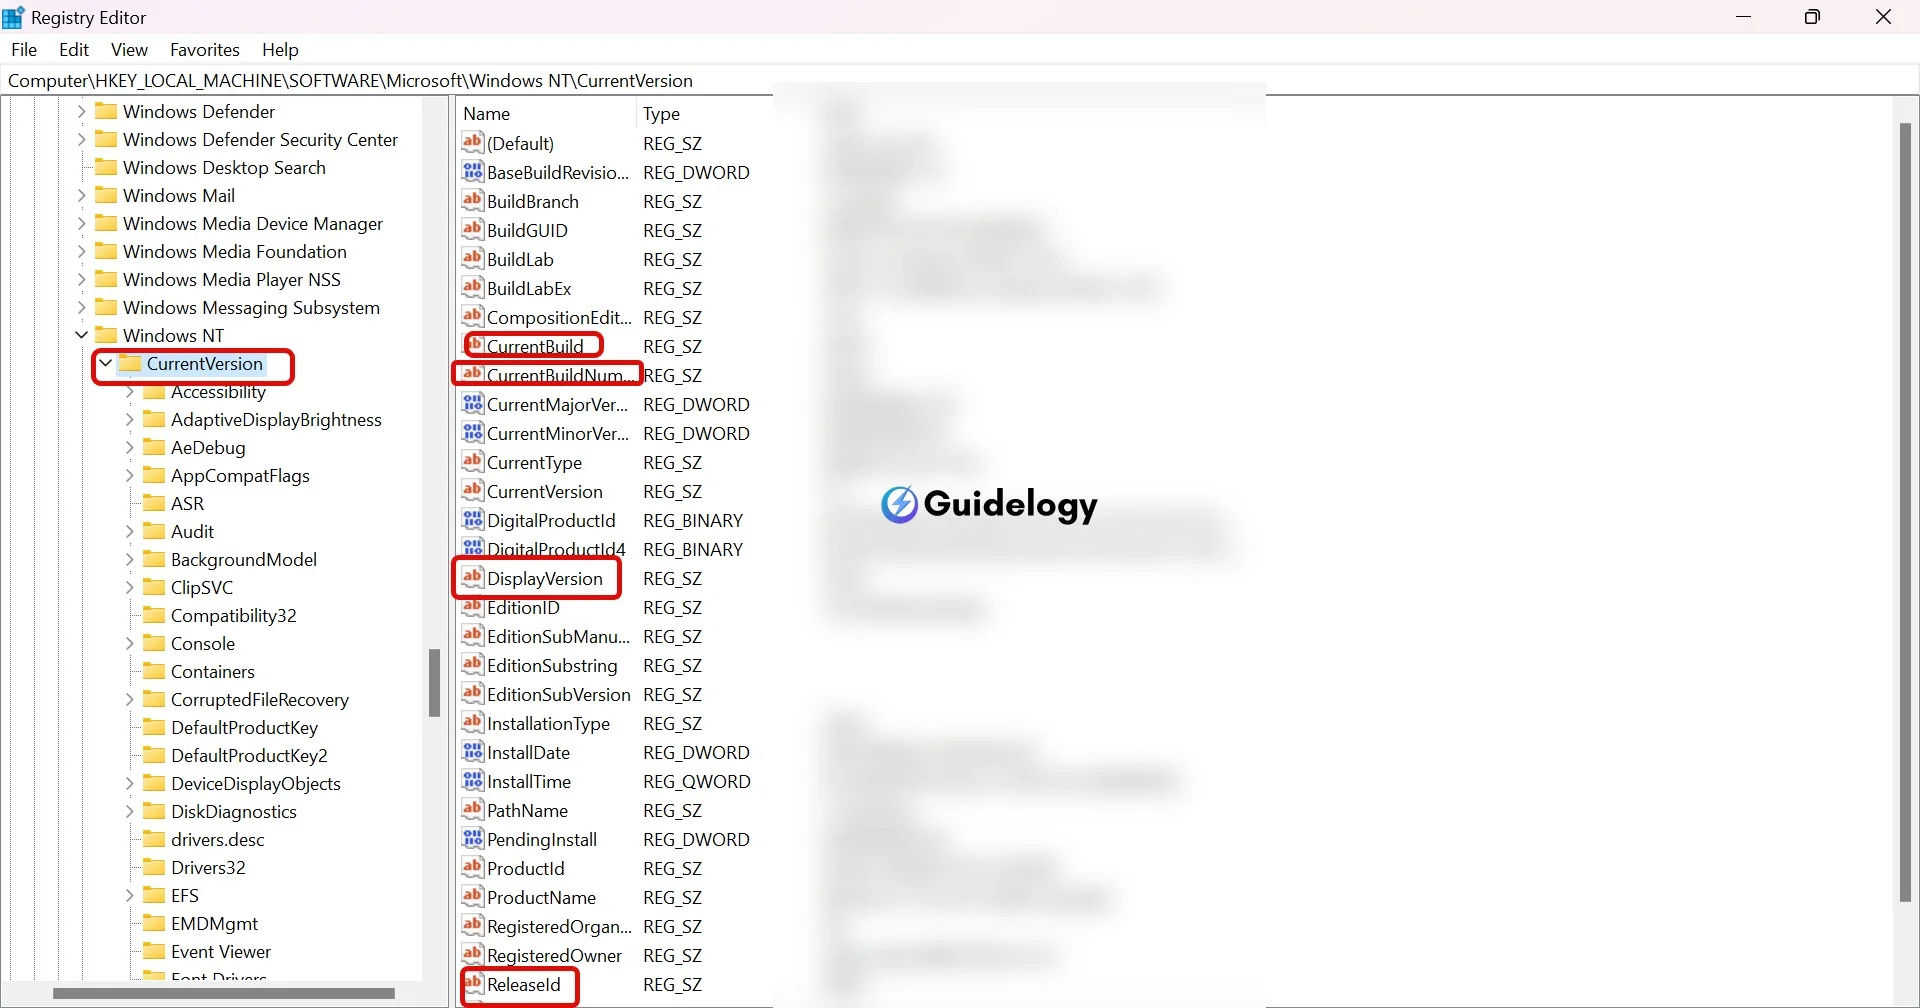
Once the Registry Editor is open, navigate to the specific key where information about the Windows version is stored. I follow this path rigorously: HKEY_LOCAL_MACHINE\SOFTWARE\Microsoft\Windows NT\CurrentVersion. This key contains various entries, including those that reveal the exact version and build number of the operating system you are running.
Step 3: Check the Version and Build Number
In the CurrentVersion subkey, focus on a few particular entries that give the details you need about your Windows 11 version:
DisplayVersion: This is where you can find the friendly name of the installed update or version of Windows. –CurrentBuild: It shows the build number of the operating system. –CurrentBuildNumber: This is another place where the build number can be verified if needed. –ReleaseId: If you are looking for the version of the feature update, this entry helps me identify it. To ensure fully understand the data looking at, here’s an example of what these entries might display:
| Entry | Data |
|---|---|
| DisplayVersion | 21H2 |
| CurrentBuild | 22000 |
| CurrentBuildNumber | 22000 |
| ReleaseId | 2021 |
With this information, you can easily figure out if your system is up-to-date or if you need to check for any updates or perform troubleshooting steps specific to the version and build you are using.
Conclusion
Knowing the version of your Windows 11 is important to keep your system updated and troubleshoot effectively. Let me guide you through the steps to find this information using the Command Prompt and the Registry Editor. Both methods are easy to follow and will help you quickly get the details you need. Remember, being aware of your system's specifics can save you time and trouble in the future. So, the next time you need to check your Windows version, you'll know exactly what to do. Keep this guide handy for future reference, and you'll always be a step ahead in managing your Windows 11 system with my expert help!
Frequently Asked Questions
How can I check my Windows 11 version using Command Prompt?
To check your Windows 11 version using Command Prompt, type winver into the command line and press Enter. A window will pop up displaying the version and build number of your Windows 11.
What is the alternative method to check Windows 11 version besides Command Prompt?
You can use the Registry Editor as an alternative method. Press Windows key + R, type regedit, and navigate to HKEY_LOCAL_MACHINE\SOFTWARE\Microsoft\Windows NT\CurrentVersion. Look for entries named DisplayVersion and CurrentBuild to find your version and build number.
Is knowing my Windows 11 version important?
Yes, knowing your Windows 11 version is vital for compatibility with software and devices, as well as for troubleshooting and receiving the correct support.
Where in the Registry Editor can I find the Windows version key?
In the Registry Editor, the Windows version key is located at HKEY_LOCAL_MACHINE\SOFTWARE\Microsoft\Windows NT\CurrentVersion.
Can I see my Windows 11 build number as well as the version number?
Yes, both the version number and build number are displayed when using either method – Command Prompt with winver command or Registry Editor under the CurrentVersion key.
