Are you struggling with messy text in your Google Sheets or Google Docs? Don't worry, you're not alone. Wrapping text is a simple and effective way to keep your data neat and easy to read. Whether you're working on a complex report or organizing a simple list, knowing how to wrap text can make a big difference.
In Google Sheets and Google Docs, wrapping text is really easy, and I can help you master it in no time. Get ready to transform your documents with just a few clicks, so that every cell or paragraph looks exactly the way you want it to. Let's dive into the steps that will help you keep your content looking sharp and professional.
How to Wrap Text in Google Sheets
Text wrapping in Google Sheets is an important skill, especially when you have spreadsheets with longer pieces of information. Whether you're dealing with detailed project descriptions or extensive lists of items, wrapping text helps keep everything visible and easy to manage.
When you work with Google Sheets, it's essential to know how to wrap text. It allows you to display all the content without cutting off any important information. With text wrapping, you can handle large amounts of data effectively.
Method 1: Using the Wrap Text Option in the Format Menu
When you're dealing with cells that cut off important text, the Format menu is your ally. Here's how to wrap text through this feature:
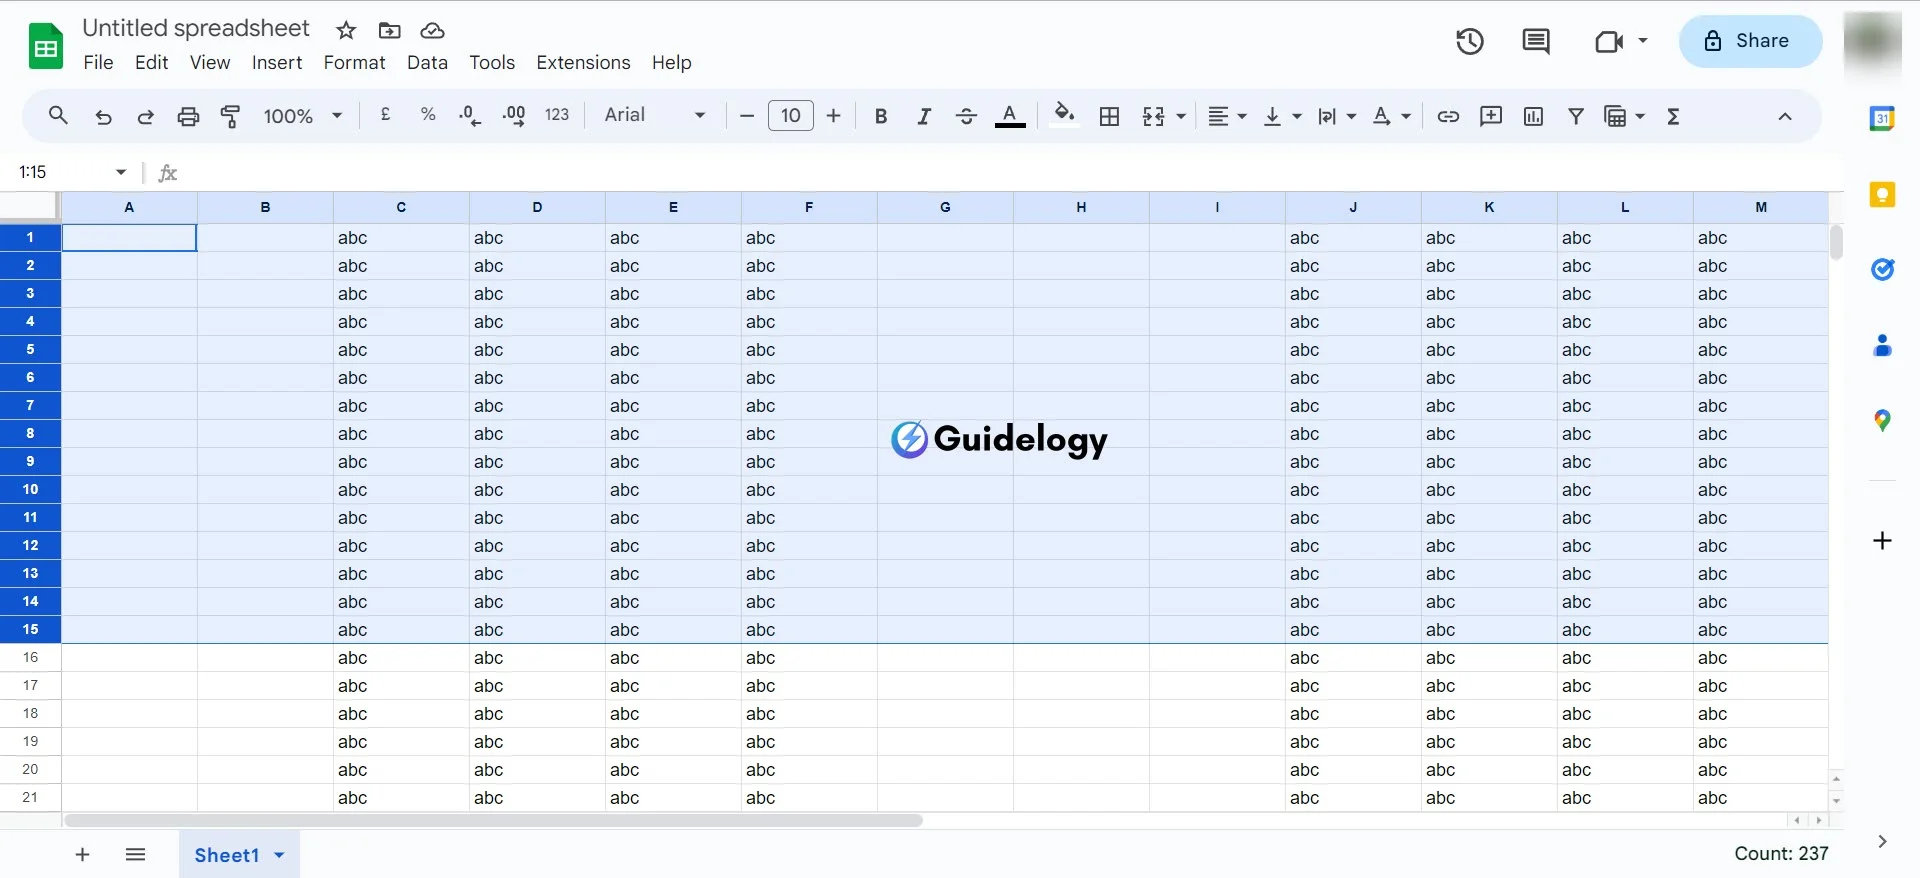
Step 1: Select the cell or range of cells where you want to apply text wrapping.
Step 2: Click on the “Format” menu in the top menu bar.
Step 3: Hover over “Text wrapping” and a side menu will appear.
Step 4: Choose “Wrap” from the options.
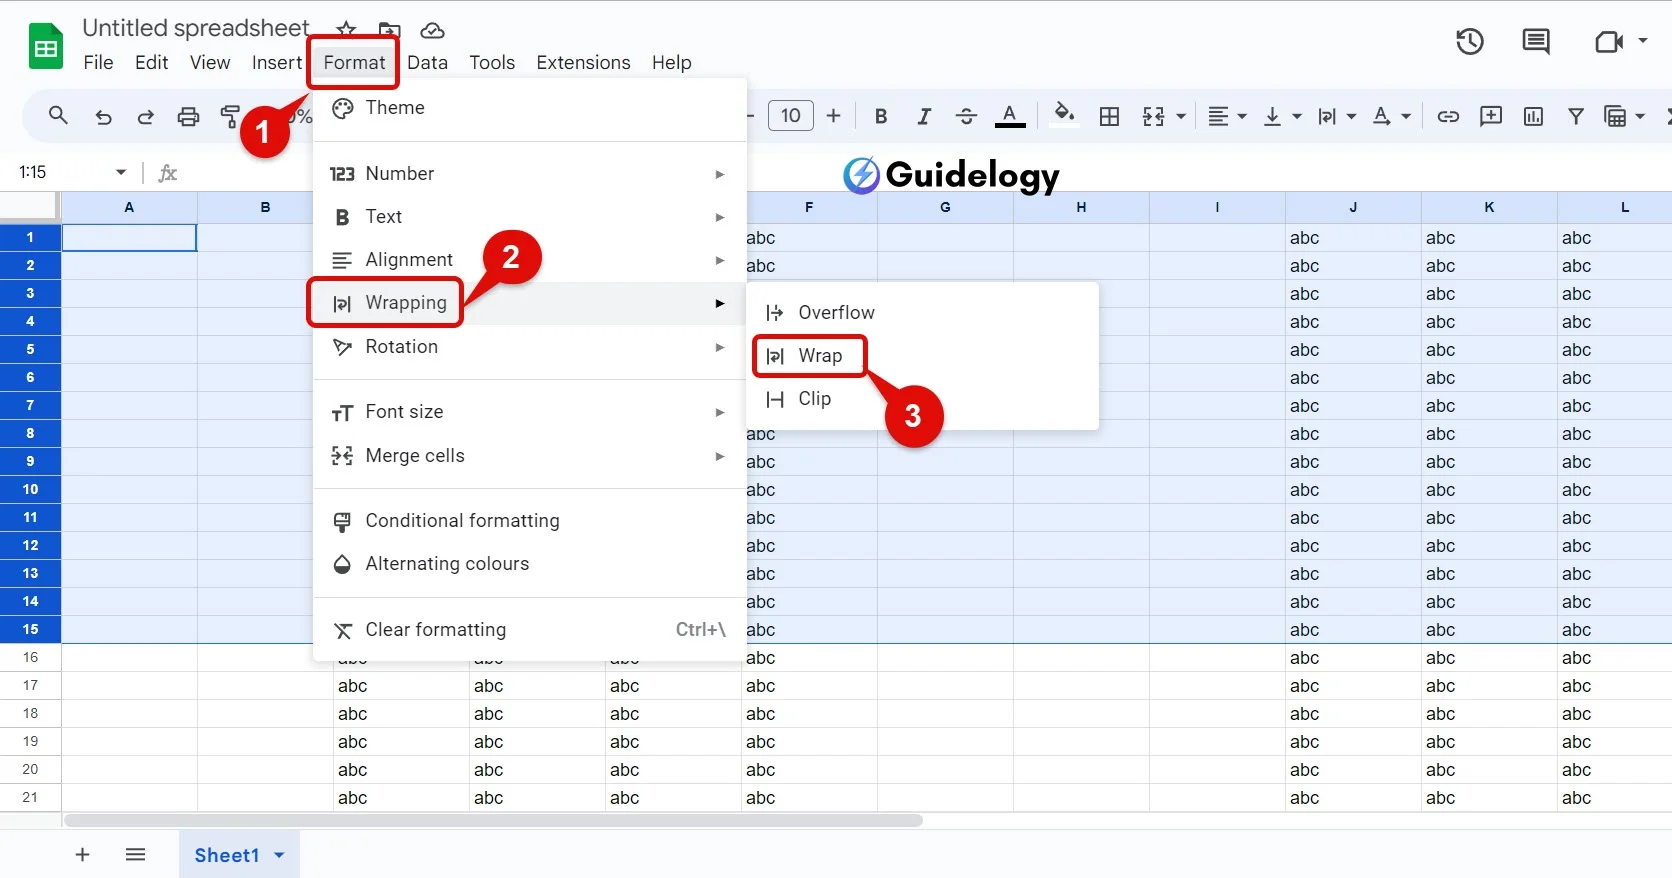
When you choose the “Wrap” option in Google Sheets, it automatically adjusts the height of the cell to fit all the content inside. This is really helpful when you're working with data that has different lengths. It ensures that none of the information gets hidden, no matter how wide or narrow the cell is.
Method 2: Using the Wrap Text Shortcut in Toolbar
For frequent spreadsheet users, using toolbar shortcuts can save you time. Wrap text quickly with these steps:
Step 1: Highlight the cells you need to modify.

Step 2: Locate the text wrapping icon in the toolbar—a box with lines indicating text.
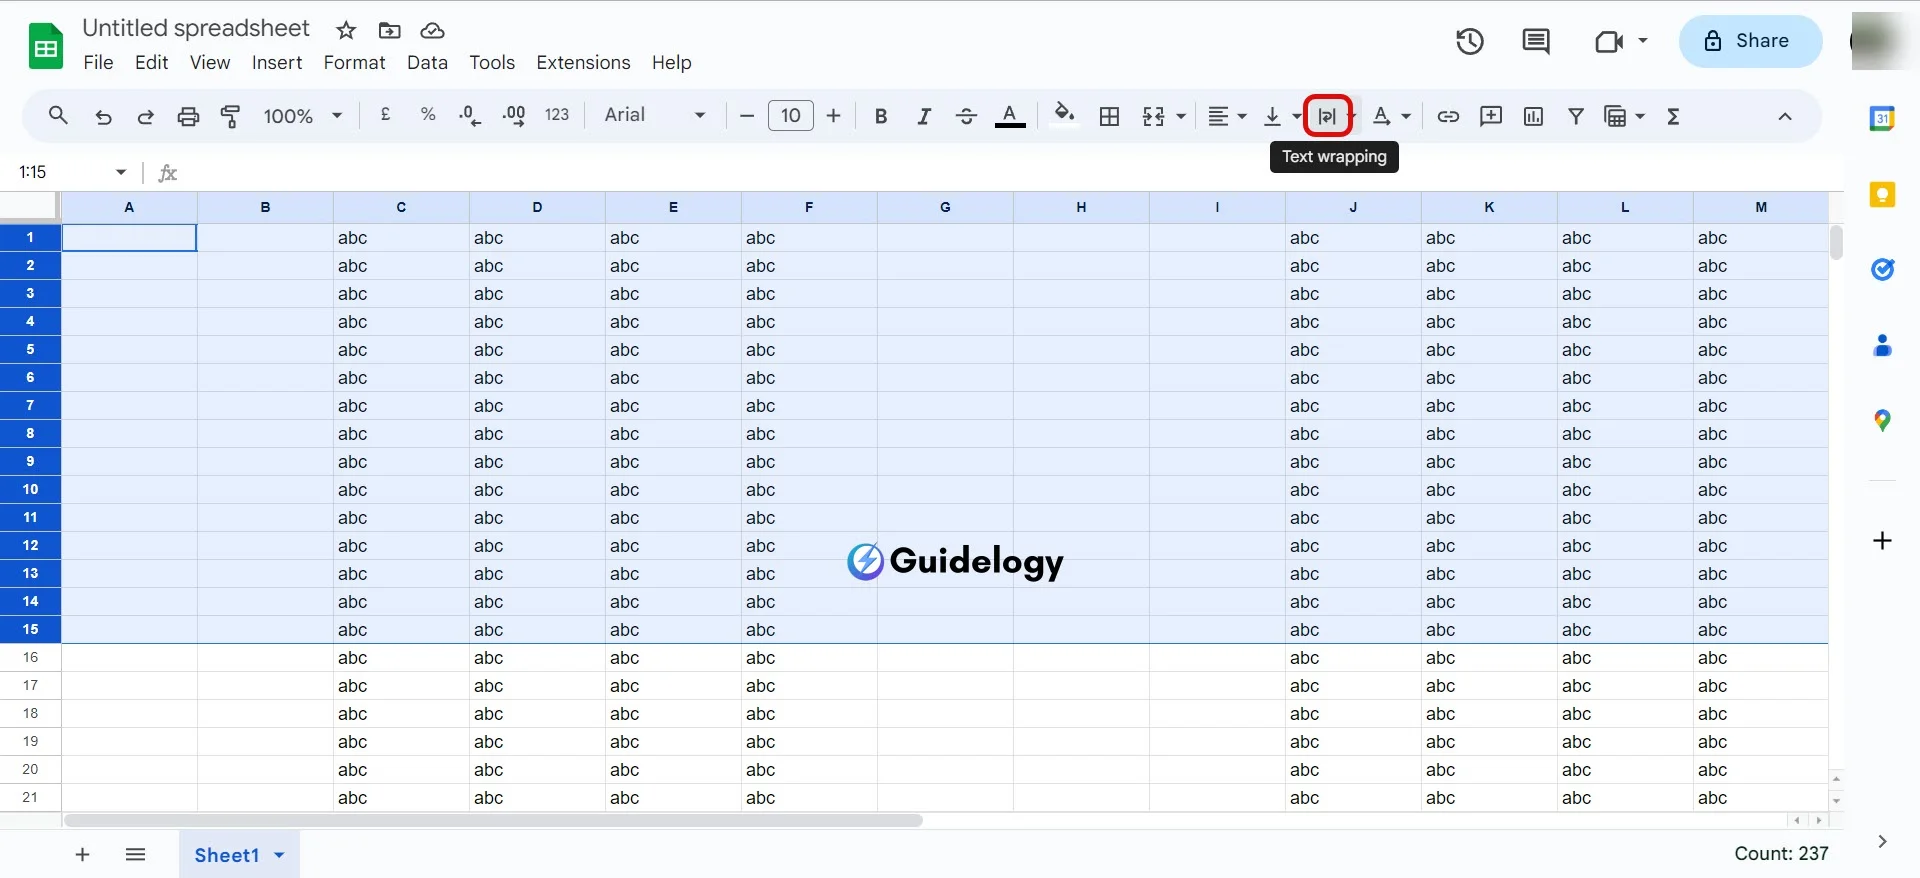
Step 3: Click on the icon, and a dropdown menu will give you three choices: “Overflow,” “Wrap,” and “Clip.”
Step 4: Click “Wrap” in the middle one to apply text wrapping.
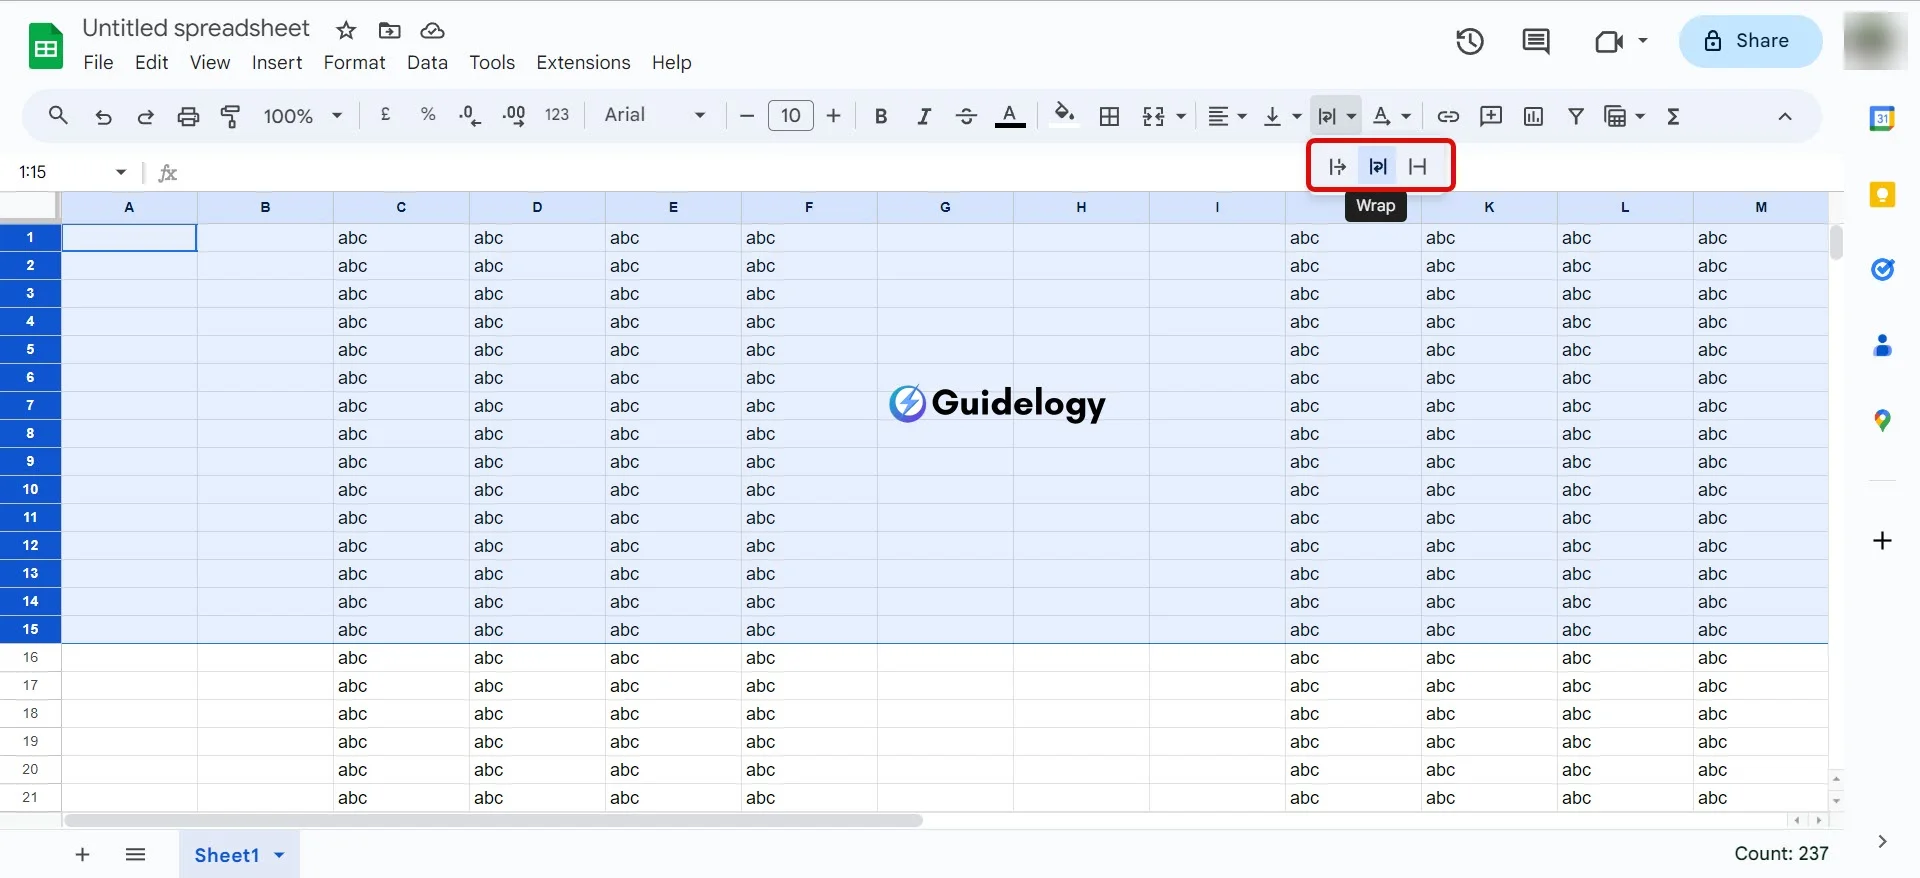
This method is a quick solution when you're in the middle of entering data and want to maintain a smooth workflow, without the need to navigate through menus. It helps you save time and stay focused on your tasks.
Method 3: Using Keyboard Shortcut
Efficiency is key in spreadsheet management. Memorize this keyboard shortcut to wrap text instantly:
- For Windows: Alt + O, W, W
- For Mac: Option + Command + O, W, W
Select the cells you want to format, then simply press the combination of keys that corresponds to your operating system. This will turn on/off text wrapping for the selected cells. It's a really helpful trick for people who want to save time while managing their data.
By using these methods confidently, you can keep your spreadsheets clear and professional. Whether you're preparing a monthly report or organizing inventory, wrapping text helps you avoid the frustration of missing or hidden data. It also ensures that your documents are both informative and visually accessible.
Also Read: How to Make a Google Doc Landscape?
How to Wrap Text in Google Docs
When you work with content in Google Docs, it's important to make sure the text is easy to read. Text wrapping can help you arrange your document's layout and ensure that nothing is hidden or missed. Let's dive into the ways you can wrap text in Google Docs.
Method 1: Using the Format Options
The most straight-forward way to wrap text in Google Docs is by using the Format options. Here's how you do it:
- Open your Google Doc.
- Select the paragraph or section of text you want to adjust.
- Go to the menu bar and click on Format.
- Hover over Align & Indent and then select Indentation Options.
- Change Left number to your wish and keep Right as 0 and Special indent should be None ensure text wraps effectively around elements, such as images.
Imagine you're creating a report that needs to include images with descriptive text aligned to the side. By wrapping the text, you can maintain a professional look, with your paragraphs neatly wrapping around any images or graphs, so enhancing the readability of your document.
Method 2: Using Tables to Wrap Text
Tables in Google Docs can also be used creatively for text wrapping:
Step 1: Insert a table by clicking Insert > Table and choose the table size accordingly.
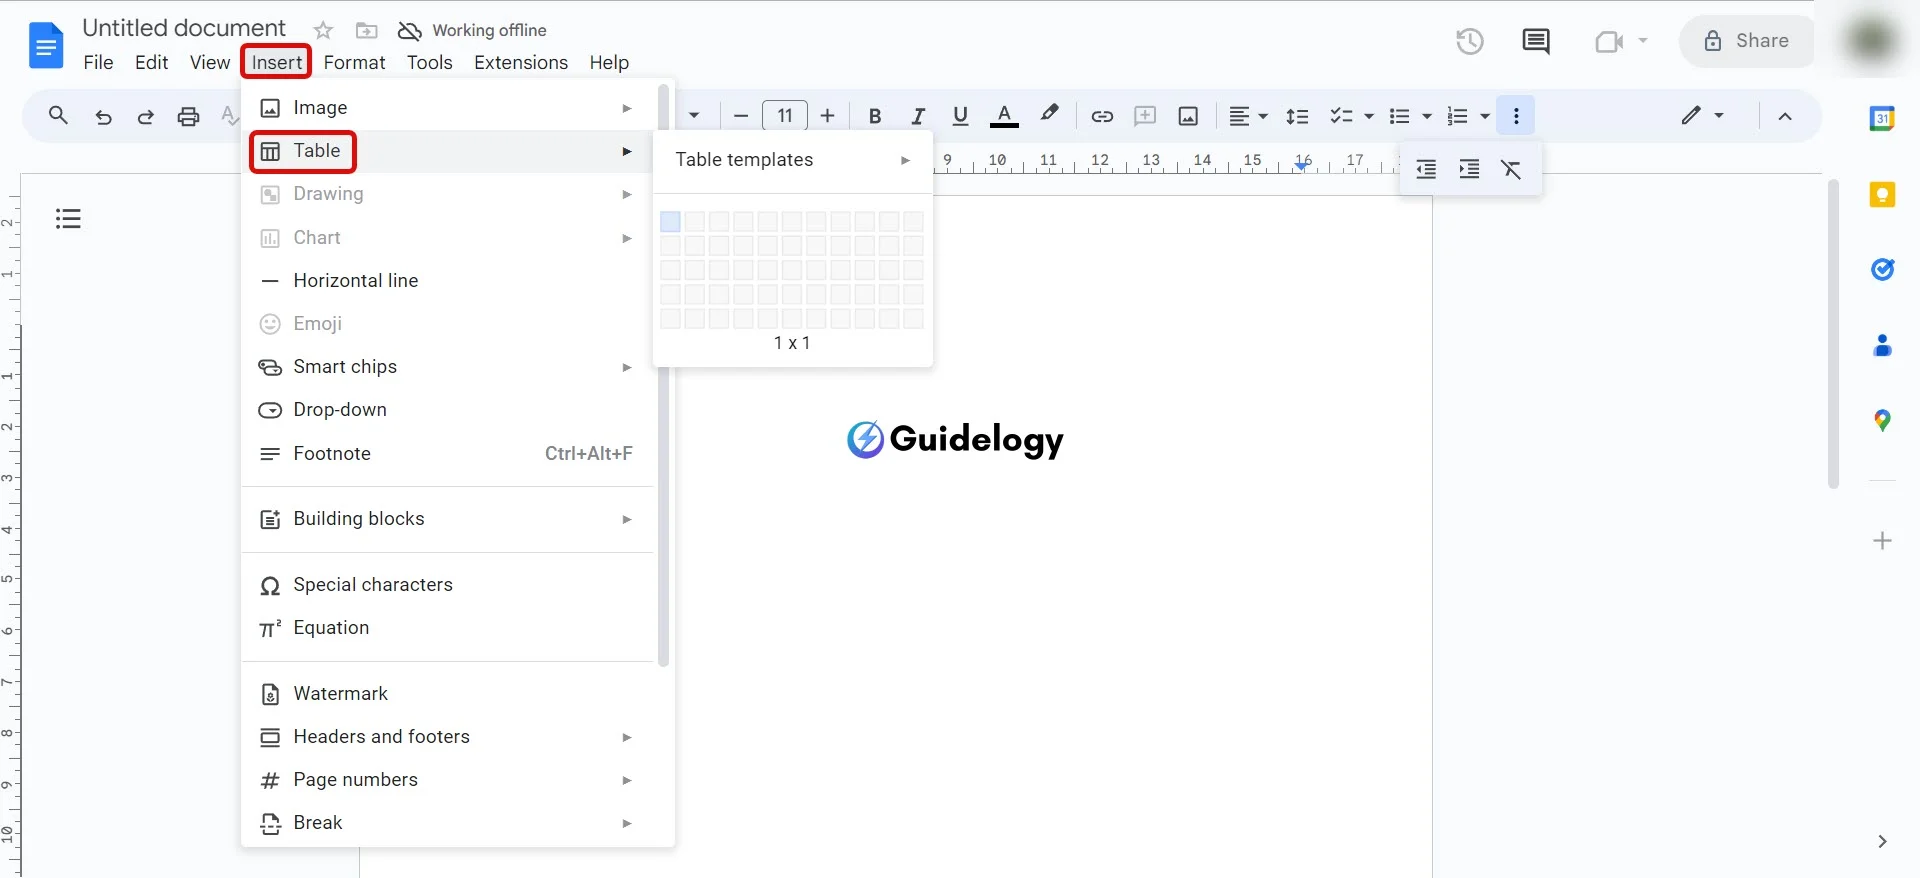
Step 2: Paste or type your text into a cell of the table.
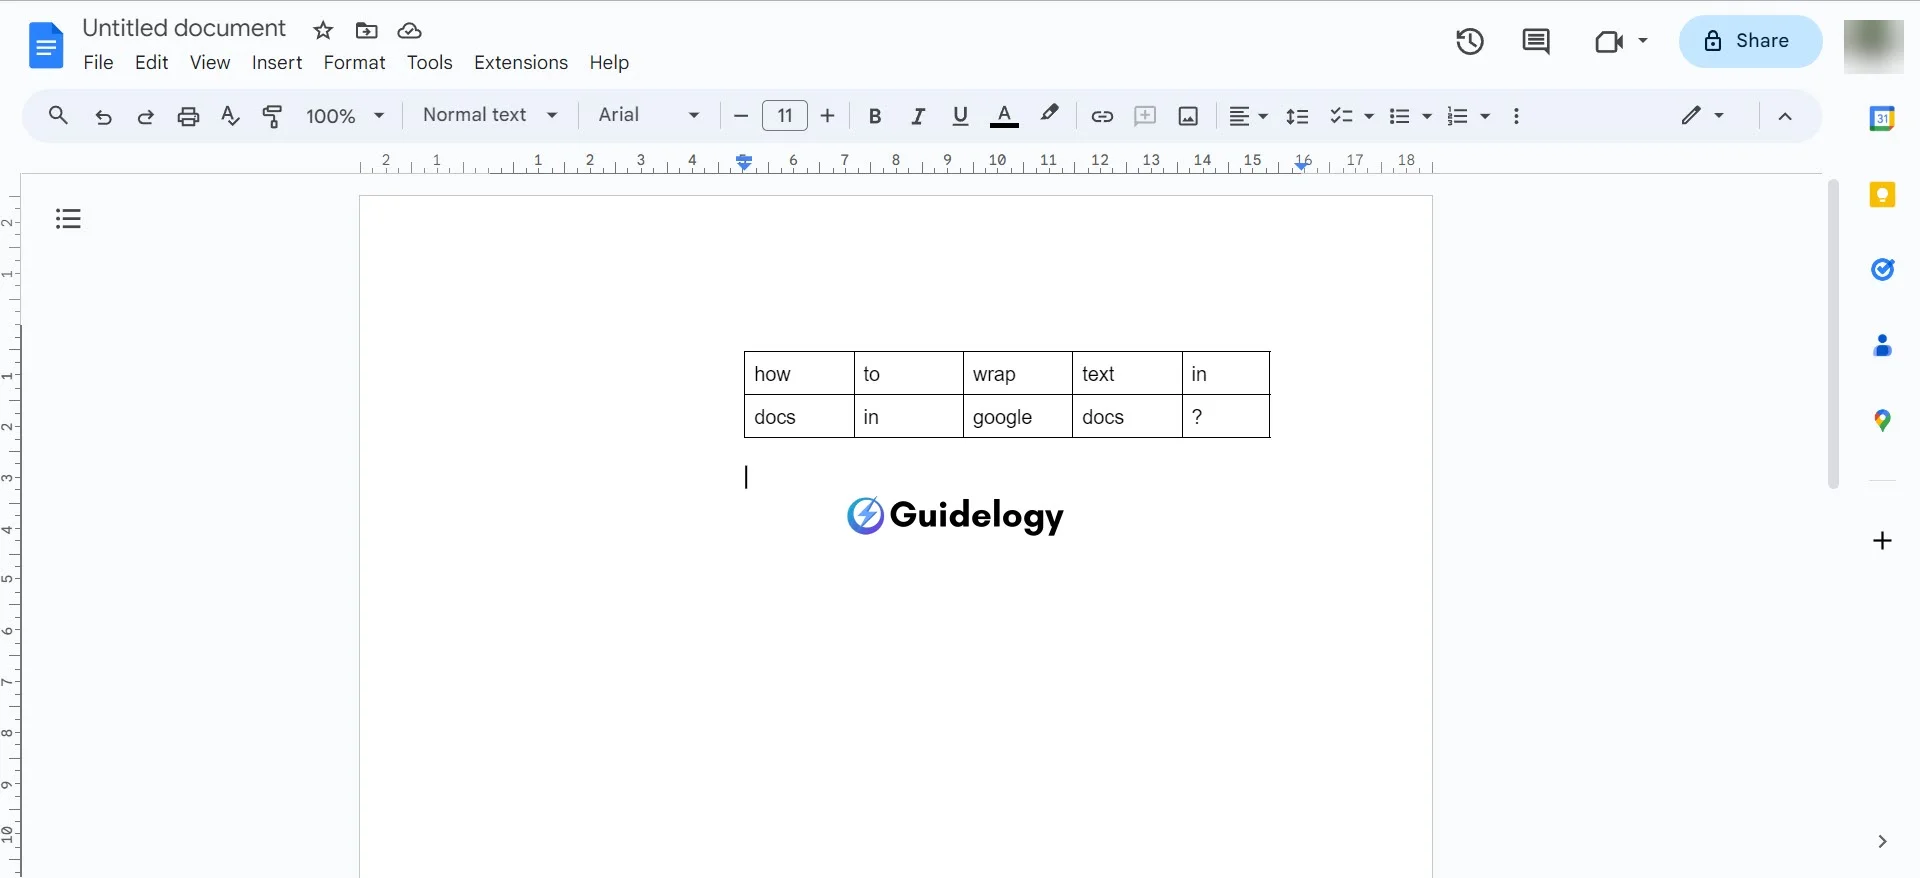
Step 3: Adjust the cell width to control the wrapping.
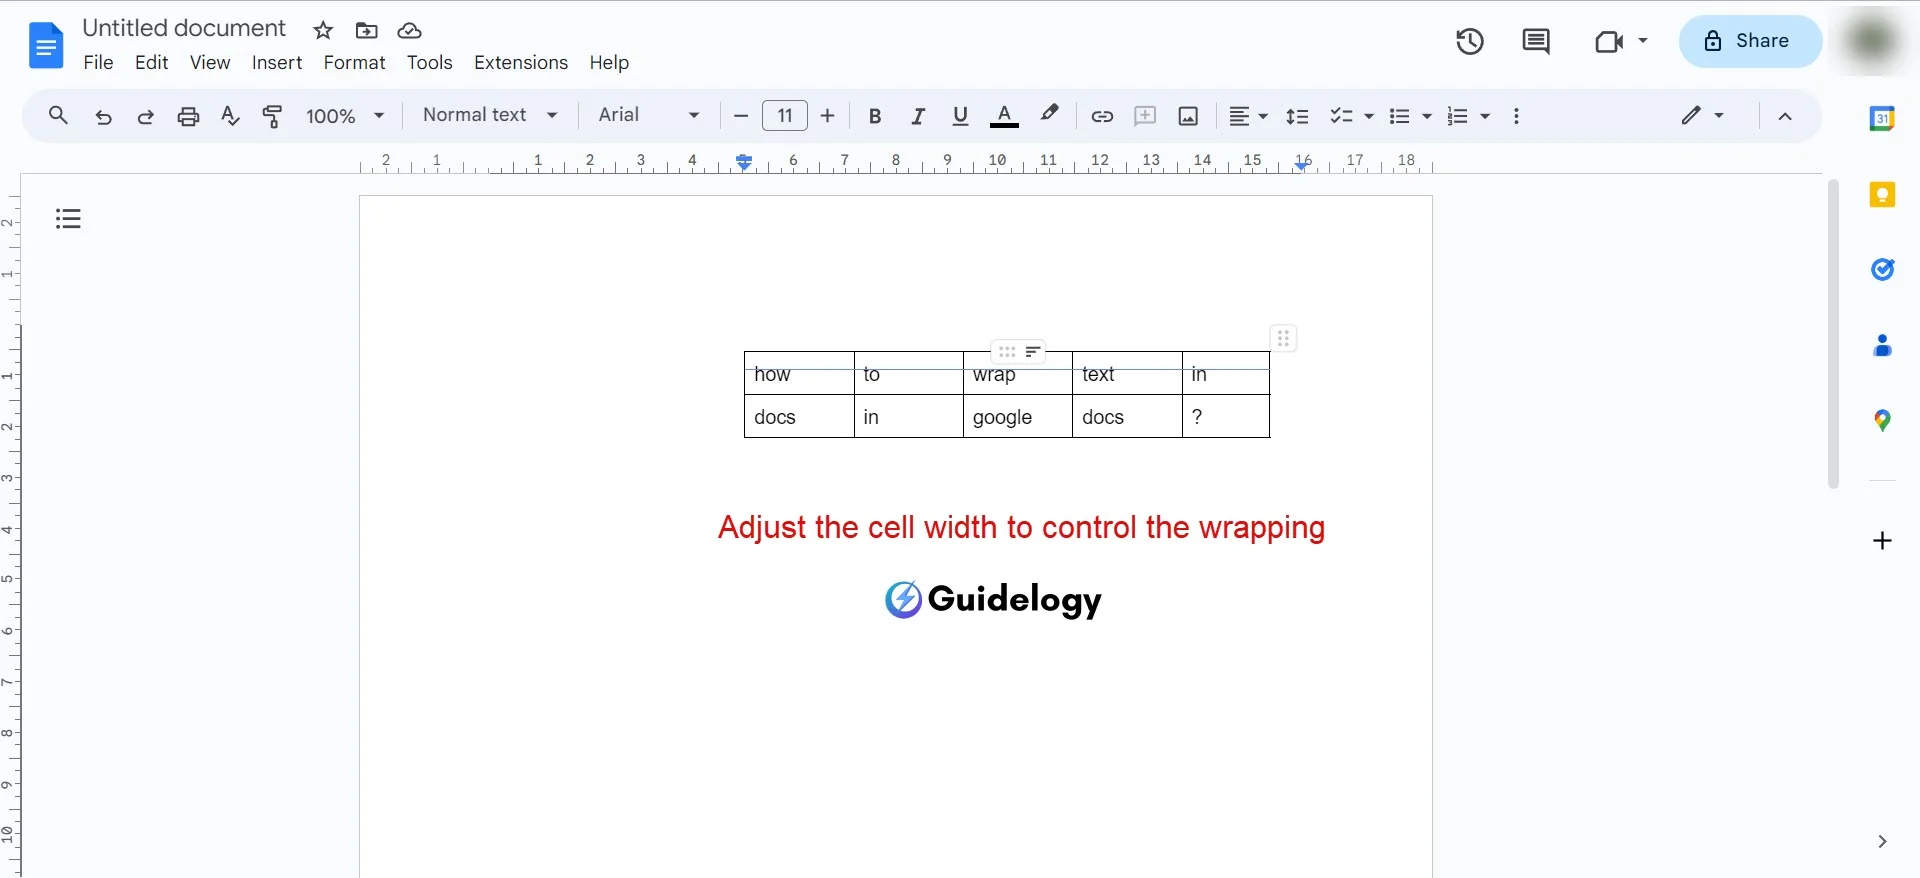
If you want to create a sidebar for annotations or references, you can use a table to control the text wrap and create a margin-like boundary. This is very useful when designing newsletters or brochures in Google Docs. Let me show you how to do it.
Method 3: Using Insert to Wrap
Finally, the Insert tool offers a unique way to control text wrapping:
Step 1: Click Insert in the top menu.
Step 2: Choose Drawing > + New.
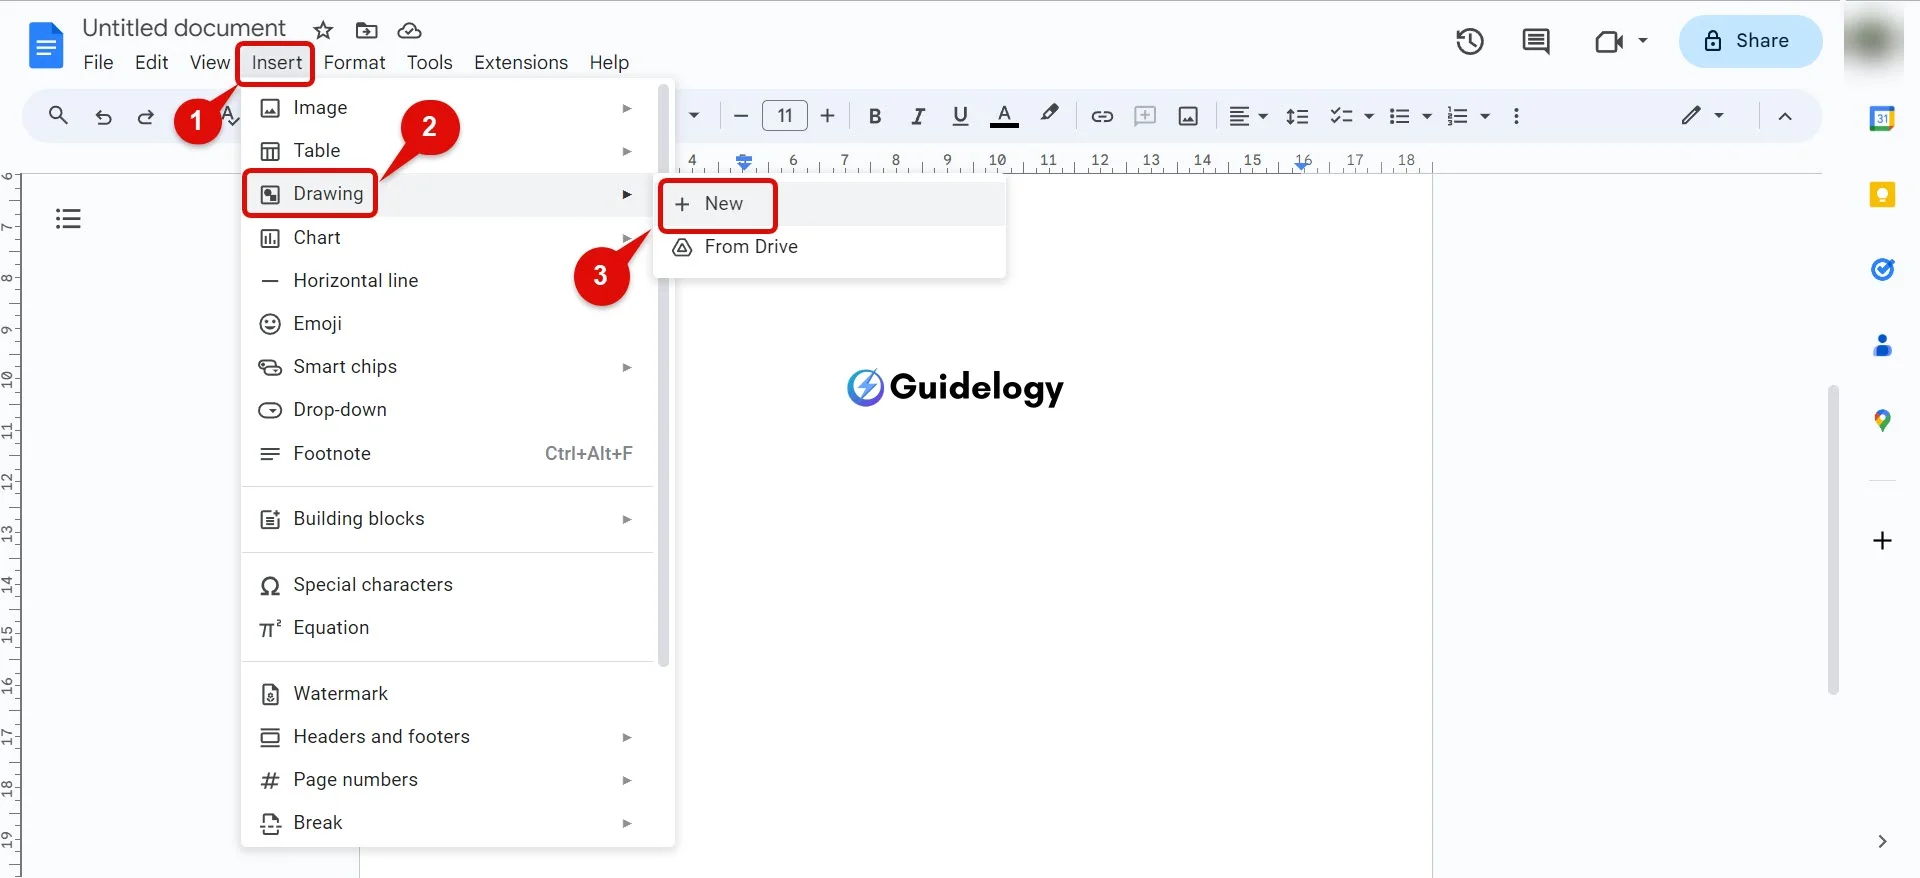
Step 3: In the drawing dialog that appears, add text boxes or images.
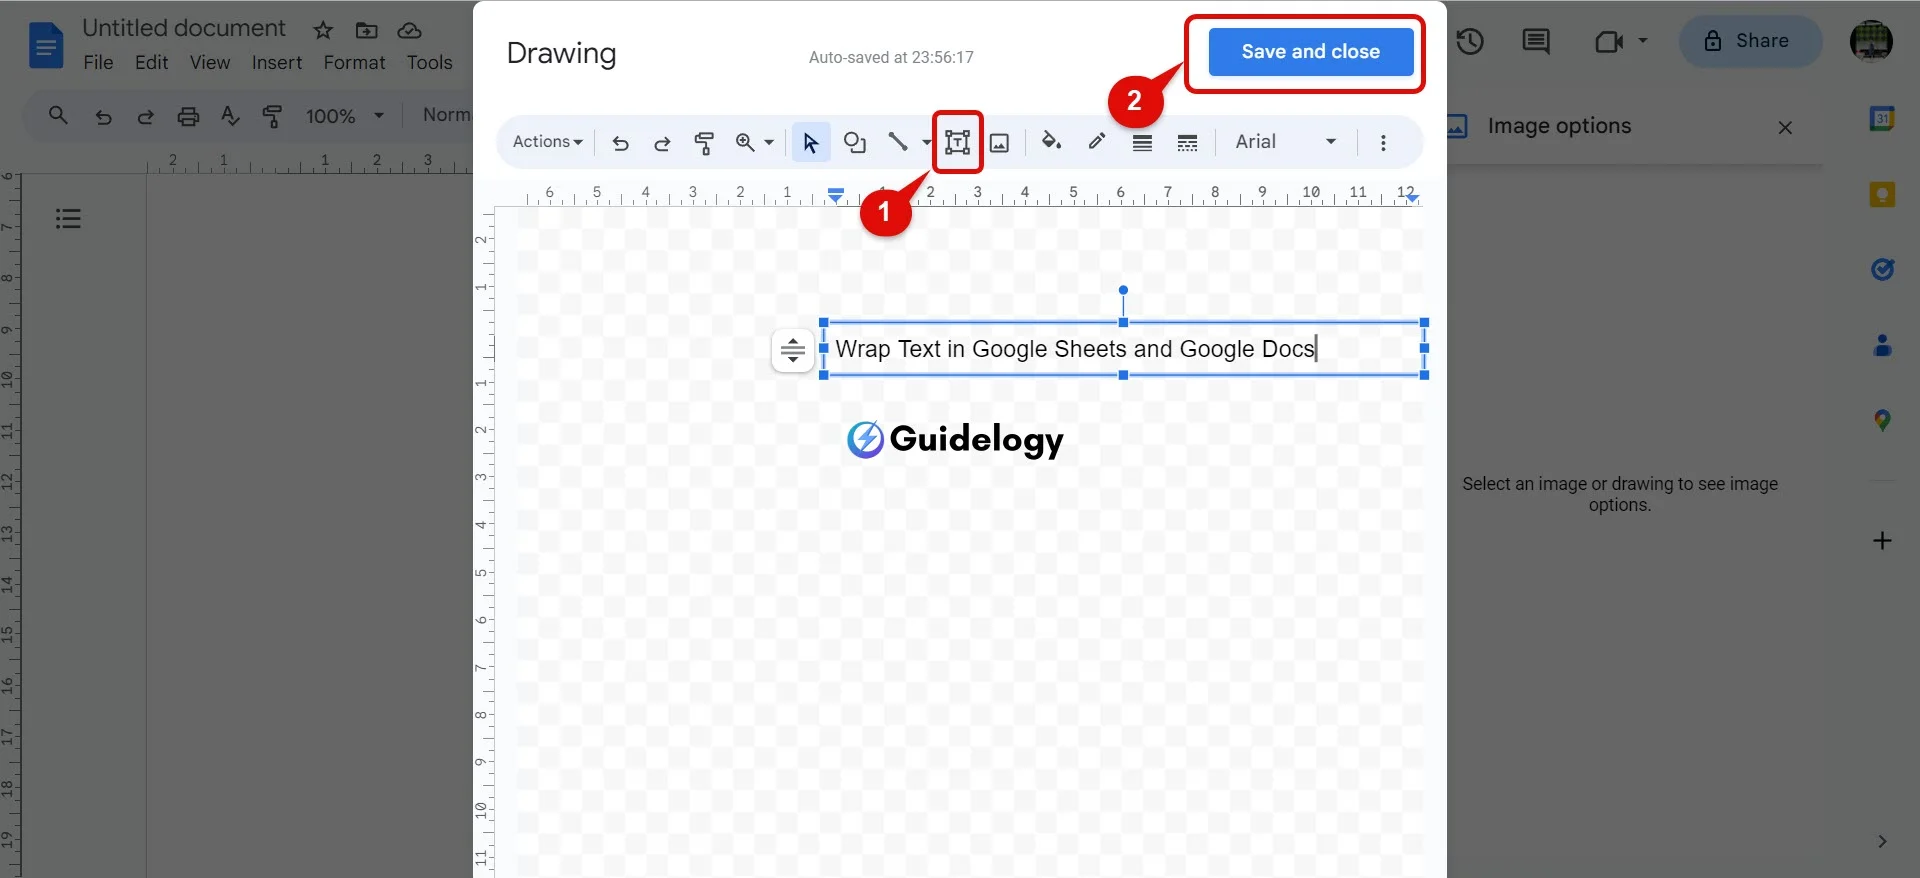
Step 4: Once added, click on the text box or image, select the three-dot menu, and click Wrap text.
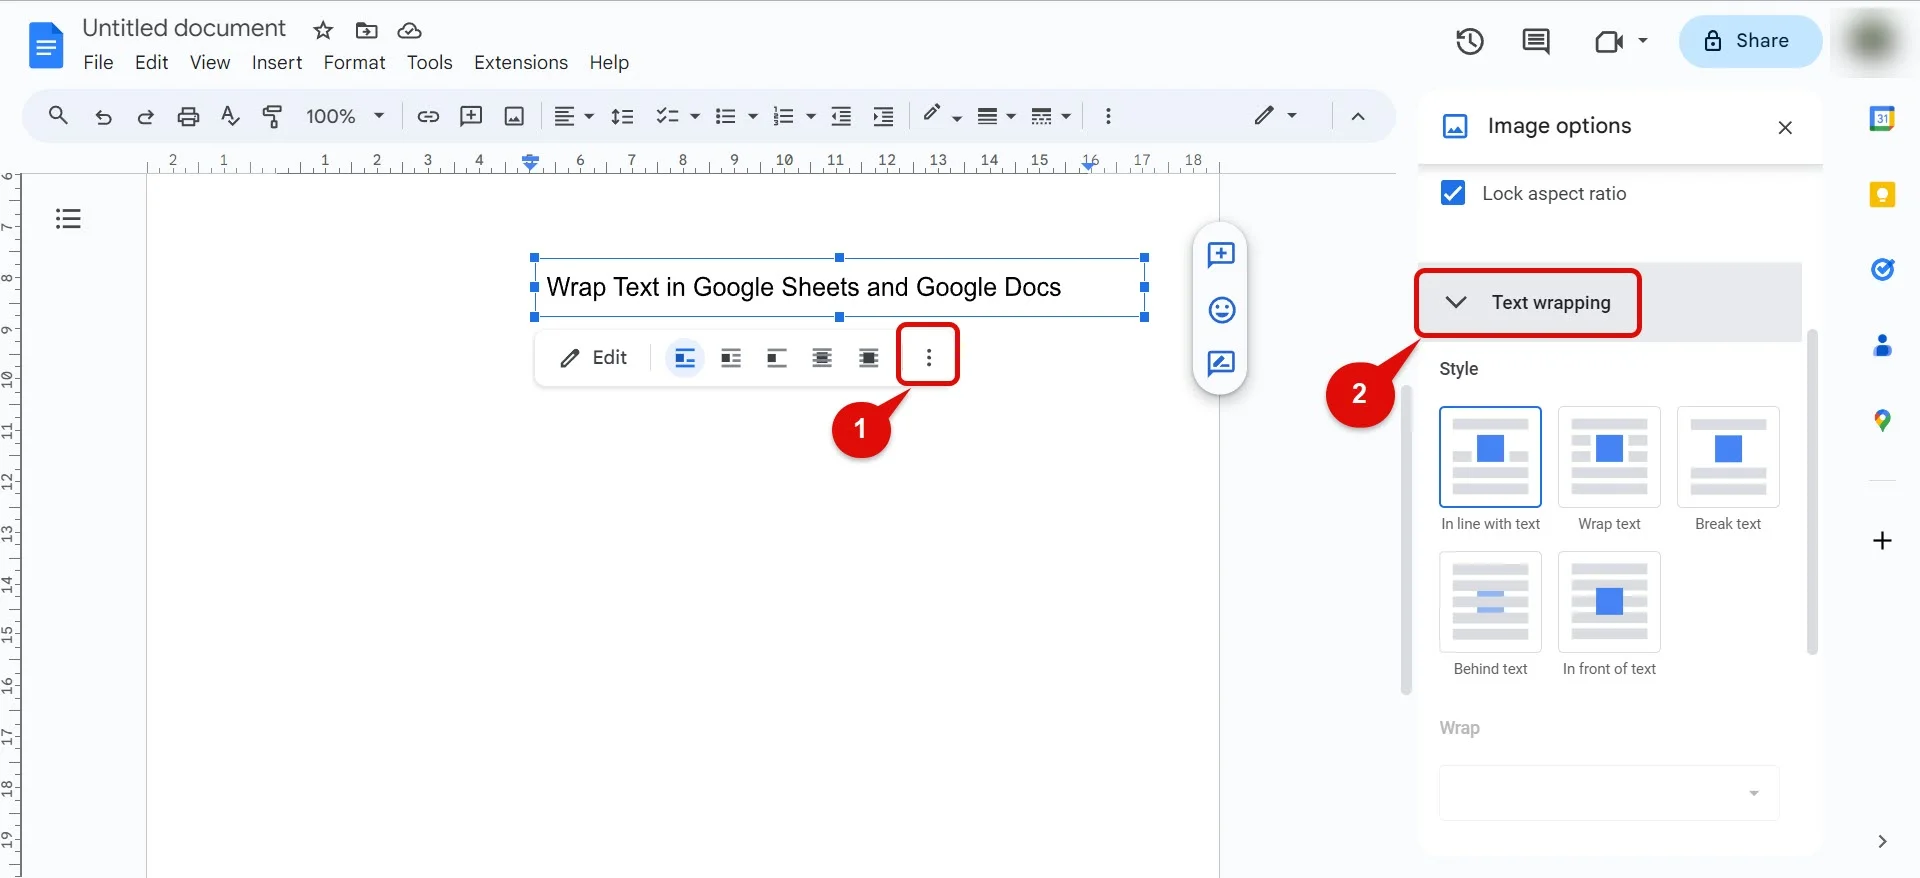
You will find this method useful when you have graphics and you want the text to have a more dynamic format around them. Let's say you're adding your own diagrams to your document; using the Insert tool to wrap the text will give you the flexibility to design around visual elements effectively.
Also Read: How To Insert a Video in Google Slides?
Applying these three methods to your Google Docs will make your content look better. Whether it's a business proposal, an academic paper, or an informative brochure, arranging how text wraps around and beside other elements will make sure that your document not only looks good but also works well. Remember, the aim is to keep your document easy to understand and interesting for your readers.
Conclusion
When you become skilled in text wrapping in Google Sheets and Docs, it helps make your documents look neat and professional. You can learn various ways to do this, like using menu options or shortcuts, which are designed to save you time and improve your workflow. Remember, the key to formatting efficiently is to use these tips to your advantage. So go ahead, present your content beautifully using the skills you've gained today with us!
Frequently Asked Questions
How can I wrap text in Google Sheets?
You can wrap text in Google Sheets by using the Wrap Text option in the Format menu, the shortcut in the toolbar, or a keyboard shortcut. These tools adjust the cell to display all the content.
What is the quickest way to wrap text in Google Sheets?
The quickest way to wrap text in Google Sheets is by using the keyboard shortcut. This allows you to wrap text instantly without navigating through menus.
Can you wrap text in Google Docs?
Yes, you can wrap text in Google Docs. The article outlines three methods: using Format options, creating tables, or using the Insert tool to ensure text is wrapped effectively.
What are the benefits of wrapping text in Google Sheets or Docs?
Wrapping text in Google Sheets or Docs improves readability and enhances the presentation of your content, making it easier for viewers to read and comprehend the information in your document.
Is using tables a good method to wrap text in Google Docs?
Yes, using tables is a good method for text wrapping in Google Docs. It can help organize your content and make it more visually appealing while maintaining the desired text flow.
